Overview
Microsoft’s Windows Server has had the ability to host NFS shares since Server 2003. There are a number of reasons why you may need it, such as backing up SharePoint or sharing files with UnixLinux computers, and for the most part it works fairly well.
This tutorial will guide you through installing and configuring it. Although not covered in this tutorial, Active Directory mappings can be created for your Linux users accounts to grant them access to directories and files using NTFS shares.
Hardware Configuration
The sizing of your server will greatly depend on the type and volume of traffic. There absolutely is no one-size-fits-all configuration. Your success will be determined by how well you know the workload profile that the server will experience.
| Lots of Large File Tranfsers | If your server primarly serves large files and many of them are transfered concurrently, you’re going to want a lot of RAM in the server. The RAM will be used as a cache before the data is transmitted. |
|---|---|
| Lots of Tiny File Transfers | If instead you are transfering a lot of tiny files, you will want the storage be on fast disks. Transfing large amounts of tiny files can create an enormous amount of I/O, which may require a RAID group with lots of disk, an SSD drive, or Flash drive. |
| High Concurrency and File Transfers | Large amounts of memory and CPU may be required to handle the load. |
| ODX Supported Backend Storage | If you have multiple shares hosted on ODX supported storage served by your file server, and your users do a lot of copies between shares, ODX will significantly improve performance. It does this by offloading the data movement to the storage controller. It also means your file server frees more resources for other connections. |
These are just examples. Your mileage will vary depending on a lot factors in your environment. The best advice I can give is to monitor your server once it is in production. Keep an eye on disk queue times, latency, CPU, and memory utilization.
Install NFS File Services
- Launch Server Manager.
- On the top menu, click Manage.
- Click Add Roles and Features.
- On the Before you begin screen, click Next.
- On the Select installation type screen, ensure Role-based or feature-based installation is selected, and then click Next.
- On the Server selection screen, click Next.
- On the Select server roles screen, expand File and Storage Services, expand File and iSCSI Services, and then check Server for NFS.
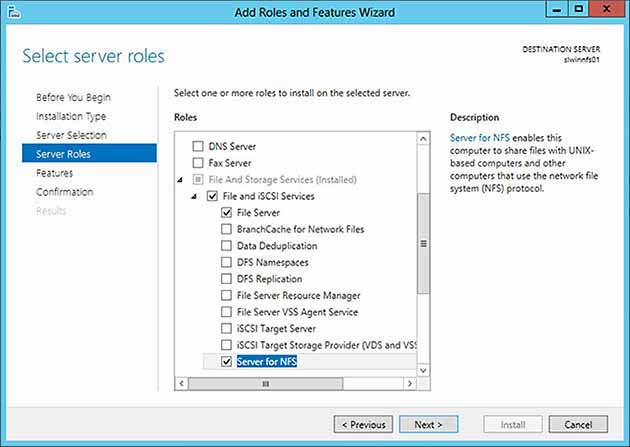
- Click Next.
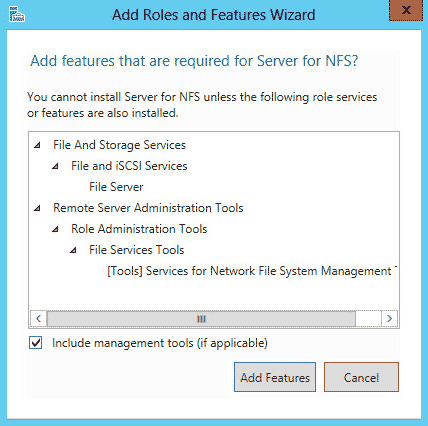
- If an Add features that are required for Server NFS dialog box appears, click Add Features.
- On the Select feature screen, click Next.
- Confirm the installation details, and then click Install.
Configure an NFS Share
- Launch File Explorer.
- Create a new directory for your NFS share.
- Right-click the directory and click Properties.
- Select the NFS Sharing tab.
- Under the NFS Sharing tab, click the Manage NFS Sharing… button
- Check the Share this folder check box.
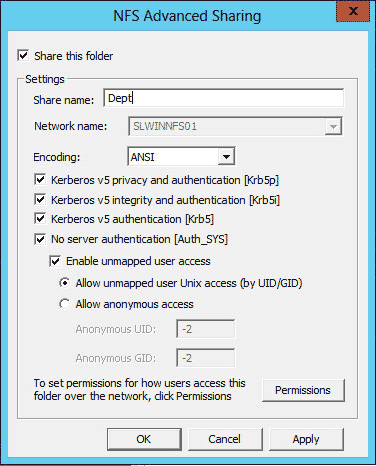
- Enter a name into the Share name text field. This will be used when a user connects to your NFS share.
- Click the Permissions button.
- Click Add and then enter the IP address or hostname of the client(s) you want to allow connections to. When added, you may also select whether they have readwrite access or read-only access.
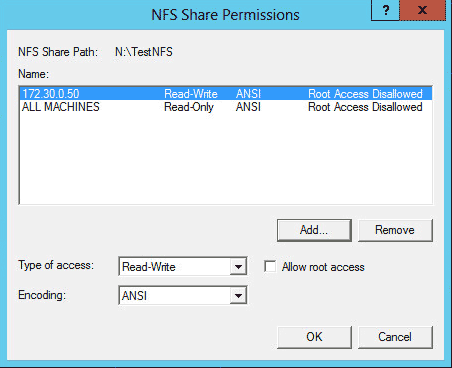
- Click OK.
- Click Apply and then OK.
- You now have a simple NFS share hosted on a Windows Server 2012 R2 box.
Connect a Linux Client to the NFS Share
- Log onto a Linux server or desktop.
- Open a terminal window, if you are in a Desktop version of the operating system.
- Create a new directory to mount the Windows NFS share.
mkdir /postprod
- Mount the NFS share to the new directory.
mount.nfs slfileserver01:/postprod /postprod
- If the client has readwrite access, test the share by creating a new file.
touch file01.txt