Overview
With Windows Server 2012, Microsoft has finally introduced the ability to properly cluster the DHCP server role. There are two different methods of clustering available: failover and load balance.
Failover clusters use the same 80/20 methodology as has always been used – where one server owns at least 80% of a scope’s available addresses and a second server own the 20%. This allowed the second server to continue registering new leases to clients if the primary DHCP server went offline.
We still follow the 80/20 rule, as there is still a need to reserve a recommended 20% of a scope’s addresses for the hot standby. The main difference now is scope settings and options replication between DHCP partner servers. We no longer need to re-create the scope and manually adjust options on the second server.
Another benefit is that the partner server can automatically take full ownership of the scope, if the primary servers is lost.
The failover DHCP cluster is defined and configured at the scope level. And unlike most other high-availability failover configurations available on Windows Servers, it does not use the Failover Clustering feature.
This step-by-step tutorial will guide you through configuring a DHCP failover cluster on Windows Server 2012 R2.
Requirements
- An existing Active Directory Domain.
- Two Windows Server 2012 R2 servers that are domain members.
Install the DHCP Server Role
The DHCP server role must be installed on both servers before the cluster can be created.
- Log onto the first server with an account that has administrative rights.
- Launch the Server Manager console.
- In the top-right corner, click Manage.
- Click Add Roles and Features.
- On the Before You Begin page, click Next.
- On the Select installation type screen, ensure Role-based or feature-based installation is selected, and then click Next.
- On the Select destination server screen, ensure Select a server from the server pool is selected, select the local server in the Server Pool list, and then click Next.
- On the Select server roles screen, ensure DHCP Server is checked. Click Add Feature when the Add Roles and Features Wizard dialog box pops-up.
- Click Next.
- On the Select features screen, click Next.
- On the DHCP Server screen, click Next.
- On the Confirmation screen, click Install.
- After the installation process completes, there should be a link named Complete DHCP Configuration. Click it to start the DHCP Server Active Directory authorization process.
- On the Description screen of the DHCP Post-Install Configuration wizard, click Next.
- On the Authorization screen of the DHCP Post-Install Configuration wizard, select the appropriate option for selecting a user with Domain Admin rights. This is required to authorize the server. When done, click Commit.
- On the Summary screen, review the output to ensure the authorization was successful. Click Close.
- On the Results screen of the Add Roles and Features Wizard, click Close.
- Log onto the second server and repeat steps 2 through 17.
Create a DHCP Scope
The cluster cannot be created unless a DHCP scope exists. Let’s create a simple scope to start.
- Log onto the first DHCP server.
- Launch the Server Manager console.
- On the top-right, click Tools.
- Select DHCP from the Tools drop-down menu.
- From the DHCP tree on the left of the console, expand the node named after the server.
- Select the IPv4 node by clicking it.
- Right-click the IPv4 node and then select New Scope.
- Go through the New Scope Wizard to create the new scope.
Create the Failover Cluster
- From within the DHCP console, right-click the IPv4 node of the DHCP server tree on the left-side.
- Click Configure Failover from the IPv4 context menu.
- When the Configure Failover dialog box appears, select from the available scopes that you wish to have in the cluster. If you want to include all of them, check the Select All box.
You can create multiple partner relationships with other DHCP servers. This allows you to create clusters between all of your remote site DHCP servers and a central head office server.
- Click Next.
- Click Add Server to add the DHCP partner server. Alternatively, you can enter its IP address or fully-qualified domain name into the text field.
- Click Next.
- On the Create a new failover relationship screen, give the cluster relationship a name.
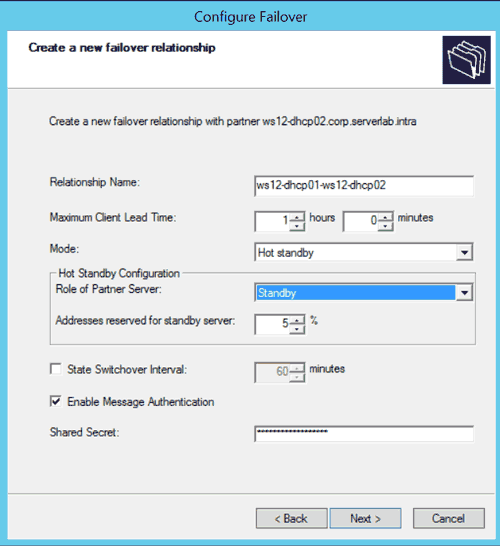
Configure DHCP Failover Relationship - Set the Maximum Client Lead Time value using hours and minutes.
This sets the maximum amount of time a partner DHCP server can extend a lease to a client after the owner of the scope fails. This also sets how long the partner DHCP will wait for the failed owner before taking full control of the scope.
- From the Mode drop-down menu, select Hot Standby.
Selecting Standby creates a fault-tolerant fail-over cluster. The other option, Load Balance, creates a load balance cluster for increased performance.
- From the Role of Partner Server drop-down, select Standby. This makes the current server the active cluster node and second server the passive node.
- Set how many of the scope addresses will be reserved for the standby server in percentages.
- In the Shared Secret text field, enter a complex password that will be used by the servers. This ensures that only servers who know the password can communicate in the cluster.
- Click Next.
- Verify your settings, and then click Finish.
- Log onto the second DHCP server.
- Launch the DHCP console and verify that the scope we created on the first DHCP server has been replicated to the second server.
Creating a DHCP Failover Cluster using PowerShell
We can accomplish the same task above using PowerShell. This is very useful when administering the servers remotely from a client computer.
- Launch PowerShell.
- Use the Add-DhcpServerv4Failover cmdlet. The example below creates a partnership (cluster) called Toronto-Failover using servers WS12-DHCP01 and WS12-DHCP02.
Add-DhcpServerv4Failover -ComputerName ws12-dhcp01 -Name Toronto-Failover -PartnerServer ws12-dhcp02 -ServerRole Standby -ScopeId 172.30.0.0
- Verify the cluster’s configuration using the Get-DhcpServerv4Failover cmdlet.
Name                : SFO-SIN-Failover
PartnerServer       : 172.30.0.232
Mode                : HotStandby
LoadBalancePercent  :
ServerRole          : Standby
ReservePercent      : 5
MaxClientLeadTime   : 01:00:00
StateSwitchInterval :
State               : Normal
ScopeId             : 172.30.0.0
AutoStateTransition : False
EnableAuth          : False