Overview
A DHCP scope is an administrative grouping of IP addresses for a network subnet. With scopes you can configure common network settings for all clients receiving addresses, such as DNS servers and network gateways.
Scopes can filter hosts by name, MAC address, and operating system to either allow them or disallow them from receiving an IP address. Scope policies can be configured to assign different options to hosts based on their name, MAC address, or operating system. For example, we can create a policy that configures the NIS server for a Linux host in addition to options set at the scope level.
This tutorial will guide you through configuring DHCP scopes on Windows Server 2012 R2.
Create a New Scope
- Launch the DHCP console.
- From the tree on the left side of the console, expand the DHCP server’s hostname node.
- Select and then right-click IPv4.
- From the IPv4 context menu, select New Scope.

FIG1 – Windows DHCP New Scope context menu - When the New Scope Wizard dialog box appears, click Next.
- On the Scope Name screen, enter the name of your new scope. You should give it a description to document its purpose. When done, click Next.
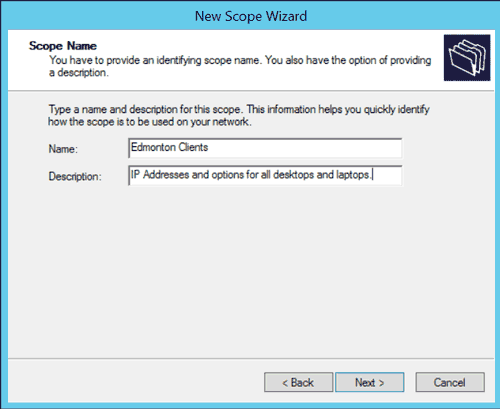
FIG2 – DHCP New Scope Wizard: Scope Name - On the IP Address Range screen, enter a starting IP address followed by an Ending IP address. This create the scope’s range, which will be used to assign addresses to clients.
- Under Configurating settings that propagate to DHCP client section of the IP Address Range screen, either enter a subnet bit length (CIDR) in the Length field, or enter the dotted decimal notation of the subnet mask.
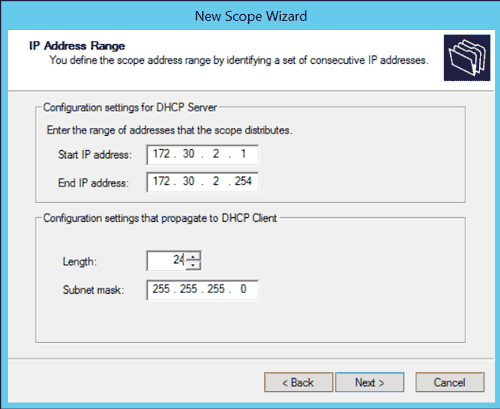
FIG3 – Windows DHCP New Scope Wizard: IP Address Range - Click Next.
- On the Add Exclusions and Delay screen, we can set IP addresses from within the range we defined that should be excluded. For example, if our range includes the IP address of our network gateway, we probably do not want our clients to use it, so we would add its IP address to the exclusion list. Click Next when done.

FIG4 – Windows DHCP New Scope Wizard: Add Exclusions and Delay - On the Lease Duration screen, enter the length of time a client should be assigned an IP address. When done, click Next.
- On the Configure DHCP Options screen, select Yes, I want to configure these options now, and then Click Next.
- On the Router (Default Gateway) screen, enter the IP address of the gateway clients should use. Click Next when done.
- On the Domain Name and DNS Servers screen, enter the IP addresses of all DNS servers the client should use. Click Next when done.
- On the WINS Servers screen, if you have WINS servers add them here. Click Next when done.
Most Windows environments no longer use WINS for name resolution. Although, some legacy applications and hardware may still require it, so check your environment before skipping this.
- On the Activate Scope page, select Yes, I want to activate this scope now. A scope must be activated before it is allowed to assign clients IP addresses. If you do not want to activate it at this time, select No, I will activate this scope later. Click Next when done.
- Click Finish.
Scope Reservations
The purpose of DHCP is to automatically assign hosts connecting to your physical network an IP address. Which IP address they get depends on what has already been assigned and what is available. With reservations, on the other hand, we can ensure that a specific host always receives the same IP address.
Why would you do this instead of just assigning the host a static IP address? Well, this allows us to centrally assign IP addresses to all of our servers.
Host reservations use the MAC address of a client’s network interface. When the DHCP server sees this MAC address during a DHCP request, it matches it to an IP address in the reservation list and then assigns that IP address to the host. No other host may be assigned the IP address.
- In the DHCP console, from the left tree view expand the scope you want to add reservations to.
- Select and then right-click Reservations. When the context menu appears, click New Reservation…

FIG5 – Windows DHCP Scope Reservation - Give the reservation a name. You should probably use the hostname of the server you are reserving the address for.
Assign the IP address.

FIG6 – Windows DHCP New Reservation - Enter the MAC address of the servers network interface.
- Document the purpose of the reservation by entering a description.
- Under Support types, select either Both, DHCP or BOOTP.
Both The reservation will be used for both DHCP requests and BOOTP DHCP requests. DHCP The reservation will only apply to standard DHCP requests. BOOTP The reservation will only apply to BOOTP requests. - Click Add to add the new reservation.
Scope Options
Scope options are used to set additional network information when a host is assigned an IP address. This can be used to set the default gateway, DNS server, local time server (NTP), and many others.
You can find options for both Windows and Non-windows operating systems. For example, we can define the IP addresses of NIS servers for our Linux\Unix environment.
Options defined at the scope level will override options set at the DHCP server level.
- Launch the DHCP console from Server Manager.
- In the General tab, select the options you want to enable. These options will apply to all DHCP clients.

FIG7 – Windows DHCP Scope Options - In the Advanced tab, select the options you want to enable for a specific class of DHCP client. Classes can be used this to specifically target Linux servers, for example, so that only the get options set in the Advanced tab.
- When done, click OK.
Available Options
The following is a list of some of the options available for use. These can be found in both the General tab and Advanced tab of the Options dialog box.
| 002 Time offset | UTC time offset in seconds of the client. |
|---|---|
| 003 Router | List of router IP addresses to be used as the default gateway. |
| 006 DNS Servers | IP address list of available DNS servers. |
| 015 DNS Domain Name | Sets the fully-qualified domain name suffix for the client. |
| 040 NIS Domain Name | Sets the NIS domain name to be used by the client. |
| 041 NIS Servers | List of IP addresses of NIS servers the client should connect to. |
| 042 NTP Servers | List of IP addresses of NTP servers the client should use for time syncs. |