Overview
Writing your infrastructure as though it were code is a huge step forward from the days of past. In a single step, you will be documenting your entire stack while orchestrating the creation of its infrastructure. A second, even larger benefit, is the ability to version control your infrastructure. Imagine being able to stand up an entire production or staging infrastructure in less than an hour, rather than days.
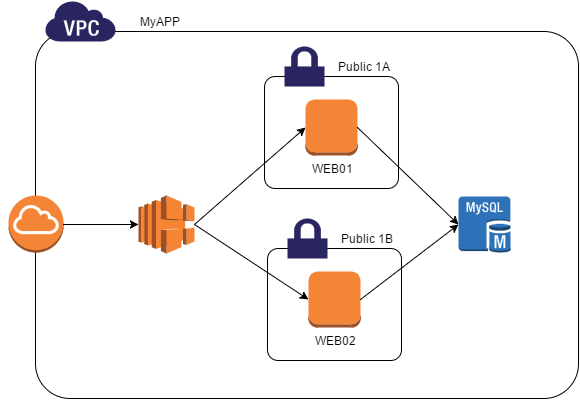
In this article, I will guide you through the process of standing up a fairly simple, but common, infrastructure hosted on Amazon’s Web Service. The diagram below illustrates how the infrastructure will look after the Terraform config is applied.
Terraform
Terraform is a product released by HashiCorp that abstracts away from your provider’s API layer, such as AWS in this case, allowing you to document your whole infrastructure in a JSON-like language that is easy to read and understand.
The tool itself goes well beyond Amazon AWS. There are a number of providers available, such as for VMWare, DigitalOcean, and Heroku to name a few.
Coding our Infrastructure
Install Terraform and Git
- Install Git.
Debian \ Ubuntusudo apt-get install git
Redhat \ CentOS
sudo yum install git
Windows
Download Git for Windows. - Download Terraform from the Terraform website at https://www.terraform.io/downloads.html
- Extract the downloaded Terraform archive into a directory set in your PATH environment variable.
Windows: C:\Windows\System32
Linux: /usr/bin.
Set the Provider
We start by defining our provider, which in our case is AWS. You will need to set some values that allow Terraform to connect and communicate with Amazon.
- Create a directory to hold your Terraform files.
mkdir -p ~/terraform/myapp
- Create a file with the extension “.tf”. In this example, the filename myapp.tf will be created.
- Open the tf file into a text editor.
- Add the following contents to it. We set the provider to “AWS” to signify it is for Amazon’s Web Service. We also specify an access key, secret key, and the region we will be building the infrastructure in.
# Configure the AWS Provider
provider "aws" {
    access_key = "${var.aws_access_key}"
    secret_key = "${var.aws_secret_key}"
    region = "us-east-1"
}
Defining the VPC Network
- Define a VPC named “myapp” and set the CIDR block to 10.100.0.0/16.
resource "aws_vpc" "myapp" { cidr_block = "10.100.0.0/16" } - Add two subnets for our public servers. Explicitly set the availability zone to ensure the two are always created in separate ones, as we will want to ensure redundancy. Because they are both public, set the map_public_ip_on_launch to true.
resource "aws_subnet" "public_1a" { vpc_id = "${aws_vpc.myapp.id}" cidr_block = "10.100.0.0/24" map_public_ip_on_launch = "true" availability_zone = "us-east-1a" tags { Name = "Public 1A" } } resource "aws_subnet" "public_1b" { vpc_id = "${aws_vpc.myapp.id}" cidr_block = "10.100.1.0/24" map_public_ip_on_launch = "true" availability_zone = "us-east-1b" tags { Name = "Public 1B" } } - To allow Internet access to our servers, add an Internet Gateway to the configuration.
resource "aws_internet_gateway" "gw" {
    vpc_id = "${aws_vpc.myapp.id}"

    tags {
        Name = "myapp gw"
    }
}
Security Groups
- Create a new security group to allow SSH access
resource "aws_security_group" "allow_ssh" { name = "allow_all" description = "Allow inbound SSH traffic from my IP" vpc_id = "${aws_vpc.myapp.id}" ingress { from_port = 22 to_port = 22 protocol = "tcp" cidr_blocks = ["123.123.123.123/32"] } tags { Name = "Allow SSH" } } - Create a security group to allow web server access to the public.
resource "aws_security_group" "web_server" { name = "web server" description = "Allow HTTP and HTTPS traffic in, browser access out." vpc_id = "${aws_vpc.myapp.id}" ingress { from_port = 80 to_port = 80 protocol = "tcp" cidr_blocks = ["0.0.0.0/0"] } egress { from_port = 1024 to_port = 65535 protocol = "tcp" cidr_blocks = ["0.0.0.0/0"] } } - Create a security group to allow MySQL RDS Access to the web servers.
resource "aws_security_group" "myapp_mysql_rds" {
  name = "web server"
  description = "Allow access to MySQL RDS"
  vpc_id = "${aws_vpc.myapp.id}"

  ingress {
      from_port = 3306
      to_port = 3306
      protocol = "tcp"
      cidr_blocks = ["${aws_instance.web01.private_ip}","${aws_instance.web02.private_ip}"]
  }

  egress {
      from_port = 1024
      to_port = 65535
      protocol = "tcp"
      cidr_blocks = ["0.0.0.0/0"]
  }
}
Create the EC2 Instances
With the network infrastructure in place, it’s time to start defining our EC2 instances.
- Create two instances for the web service, with one in each public subnet defined above. The instances will both be t1.micro, and they will both run Ubuntu 14.04 LTS.
resource "aws_instance" "web01" {
    ami = "ami-408c7f28"
    instance_type = "t1.micro"
    subnet_id = "${aws_subnet.public_1a.id}"
    vpc_security_group_ids = ["${aws_security_group.web_server.id}","${aws_security_group.allow_ssh.id}"]
    key_name = "myapp keypair"
    tags {
        Name = "web01"
    }
}

resource "aws_instance" "web02" {
    ami = "ami-408c7f28"
    instance_type = "t1.micro"
    subnet_id = "${aws_subnet.public_1b.id}"
    vpc_security_group_ids = ["${aws_security_group.web_server.id}","${aws_security_group.allow_ssh.id}"]
    key_name = "myapp keypair"
    tags {
        Name = "web02"
    }
}
Add the ELB for Load Balancing
- Define an ELB to attaches to the two public subnets, add both web EC2 instances, and set an HTTP listener.
resource "aws_elb" "web-elb" {
  name = "web-elb"
  availability_zones = ["us-east-1a", "us-east-1b"]

  listener {
    instance_port = 80
    instance_protocol = "http"
    lb_port = 80
    lb_protocol = "http"
  }


  health_check {
    healthy_threshold = 2
    unhealthy_threshold = 2
    timeout = 3
    target = "HTTP:80/"
    interval = 30
  }

  instances = ["${aws_instance.web01.id}","${aws_instance.web02.id}"]

  cross_zone_load_balancing = true
  idle_timeout = 400
  connection_draining = true
  connection_draining_timeout = 400

  tags {
    Name = "Web ELB"
  }
}
Define the MySQL RDS Instance
-
- Create the DB Subnet Group.
resource "aws_db_subnet_group" "myapp-db" {
    name = "main"
    description = "Our main group of subnets"
    subnet_ids = ["${aws_subnet.public-1a.id}", "${aws_subnet.public-1b.id}"]
    tags {
        Name = "MyApp DB subnet group"
    }
}
- Create the DB Subnet Group.
- Create the RDS Instance.
resource "aws_db_instance" "web-rds-01" {
    identifier = "myappdb-rds"
    allocated_storage = 10
    engine = "mysql"
    engine_version = "5.6.17"
    instance_class = "db.t1.micro"
    name = "myappdb"
    username = "foo"
    password = "bar"
    vpc_security_group_ids = ["${aws_security_group.myapp_mysql_rds.id"]
    db_subnet_group_name = "${aws_db_subnet_group.myapp-db.id}"
    parameter_group_name = "default.mysql5.6"
}
Version Control Your Files
With the base infrastructure defined our files should be added to version control. Using Git, initialize the repository and commit the changes.
- If your text file is still open, save it and then close it.
- Initialize the repository.
git init .
- Add the “.tf” to the repository.
git add myapp.tf
- Create the initial commit for your infrastructure.
git commit -m "Initial commit"
- Our infrastructure is now under version control and ready to be deployed for the first time!
Managing your Infrastructure
Deploy Your Infrastructure
Run the following command to deploy your infrastructure using Terraform.
terraform apply
Destroy Your Infrastructure
Run the following command to delete all resources created by Terraform.
terraform destroy


