Overview
The file transfer protocol (FTP) has been around for a very long time. Despite its age, it is still a very popular choice for transfering files between computers. Its downfall is that it was created in the infancy of network computing and, as a result, is very insecure on its own. Back then, due in large part to the community, you had a lot of trust in the users accessing your server. It risk of sending your credentials over the wire in clear text was minimal.
Fast forward to today’s Internet and computer networking. Long gone are the days you could publicly serve an unprotected ftp server without worrying about a thousand malicious users attacking it, 24-hours a day. Anyone with a packet sniffer, like nmap, can watch your unencrypted data transfer over the wire. If you’re logon credentials are submitted in clear text, they will get them.
To protect your users from things like man-in-the-middle attacks and packet sniffers, for example, we now utilize technologies like SSLTLS to protect the traffic – the same tech protecting financial websites and online shopping carts. With SSLTLS, we can both encrypt the data and guarantee its integrity.
Obtaining Signed Certificates for SSLTLS
There are three options to obtain a signed certificate for creating the SSLTLS secured connections between your server and its clients. The one you chose depends on your environment and the users who will be using your server.
Without diving to far into the details, certificates work by using a pyramid chain of trusts. Each layer is an authority that must be trusted, begining at the top. If any one of those layers is untrusted, the certificate becomes invalid. Your certificate’s pyramid can be a single authority or any number more.
- Purchase a Certificate
This involves finding a trusted certificate signing authority, like Symantec Versign or GeoTrust, and purchasing one. If your target audience is Internet users, this is your best choice. This certificate can be verified and trusted by anyone, which means your users will not get a warning about using an untrusted certificate. - Generate one from an Internal Certificate Authority
If your environment has its own PKI certificate infrastructure, like one hosted by Windows Active Directory Certificate Services, for example, you can generate your own with the knowledge that all of your organization’s users will trust it. However, any user not a part of your organization will receive a warning. - Self-signed Certificate
This is the least secure method, as it is not trusted by anyone other than the computer who generated it, by default. It’s perfect for testing environments or between a few computers where you can manually create the trusts required.
In this tutorial, we’ll be using a Self-signed Certificate for sole purpose of having an example of applying a certifcate to the FTP services.
Generate a Privately Signed Certificate
Follow this step only if you have no other means of obtaining a certificate or if you are working in a lab environment.
- Install the OpenSSL package
sudo apt-get install openssl
- Create the private key, which must be protected, that will be used to generate your certificate.
openssl genrsa -out serverlab.key 2048
- Using the private key we just generated, create a Certificate Signing Request file. This file is used to populate the required information that will be encoded into our certificate. It’s used to validate the owner of the certificate.
openssl req -new -key serverlab.key -out ftp.serverlab.intra.csr
- Finally, generate the certificate using both the private key and the certificate signing request file. We’ll set the certificate’s expiration to 365 days from today.
openssl x509 -req -days 365 -in ftp.serverlab.intra.csr -signkey serverlab.key -out ftp.serverlab.intra.crt
- Now that our signing key, certificate request, and certificate have been generated, it’s time to move them to an appropriate place on our server. We’ll then point VSFTPD to these locations.
pre class=”bash”>cp ftp.serverlab.crt /etc/pki/tls/certs/cp serverlab.key /etc/pki/tls/private/
cp ftp.serverlab.intra.csr /etc/pki/tls/private/
Install and Configure VSFTPD
- Install ftpd
sudo apt-get install ftpd
- Open the configuration file for ftpd into a text editor.
sudo nano /etc/vsftpd.conf
- Add the following lines to enable SSLTLS. If the options already exist, modify them to match what’s shown.
ssl_enable=YES
allow_anon_ssl=NO
force_local_data_SSL=YES
force_local_logins_SSL=YES
ssl_tlsv1=YES
ssl_sslv2=NO
ssl_sslv3=NO
listen_port=990
require_ssl_reuse=NO
ssl_ciphers=HIGH
- Configure the location of our private key and certificate file. If the options below already exist, modify them to point to the files.
rsa_cert_file=/etc/ssl/cert/ftp.serverlab.intra.crt
rsa_private_key_file=/etc/ssl/private/serverlab.key
If you receive your certificate from an external party or had it generated by Windows AD CS, it may have an extention of .pem. This file contains both the key and certificate, typically. Enter the path of the PEM file in both options.
rsa_cert_file=/etc/ssl/cert/serverlab.pem
rsa_private_key_file=/etc/ssl/private/serverlab.pem
- Save your changes and exit the text editor.
- Restart VSFTPD’s service.
sudo service vsftpd restart
Register the Server’s Hostname
A TLS certificate only works when the service using it is accessed by the hostname defined during the Certifcate Signing Request phase. If you have a DNS server, register the FTP server’s IP address to the hostname. If you do not have a DNS server, add an entry into your HOSTS file.
Test the Connection
Our secured ftp server is now online serving files for the local users. It’s time we test our configuration to ensure that everything is working. In this example, I will doing the test with FileZilla on a Windows 8.1 desktop.
- Launch FileZilla
- Create a new connection. Do not use the quick connect – the connection will fail.
- Enter the hostname of the FTP server in the Host text field.
- Set the Port to 990.
- Set the Encryption drop-down to Require explicit FTP over TLS.
- Enter the user logon credentials.
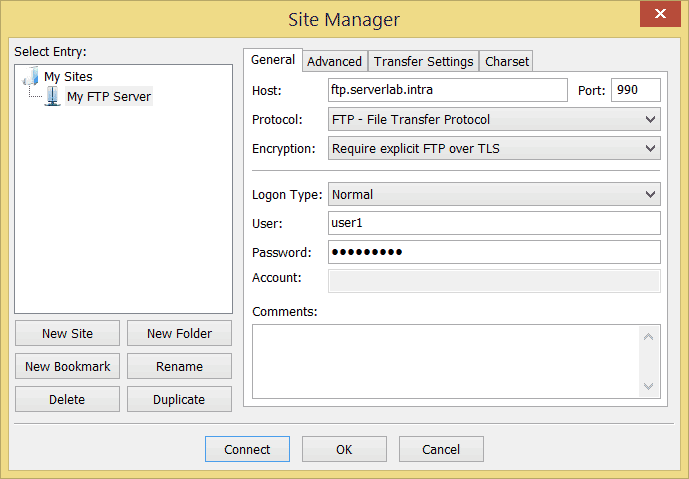
- Navigate to the Transfer Settings tab.
- For the Transfer mode select the Active radio button.
- Click the Connect button to save your settings and connect to the ftp server.
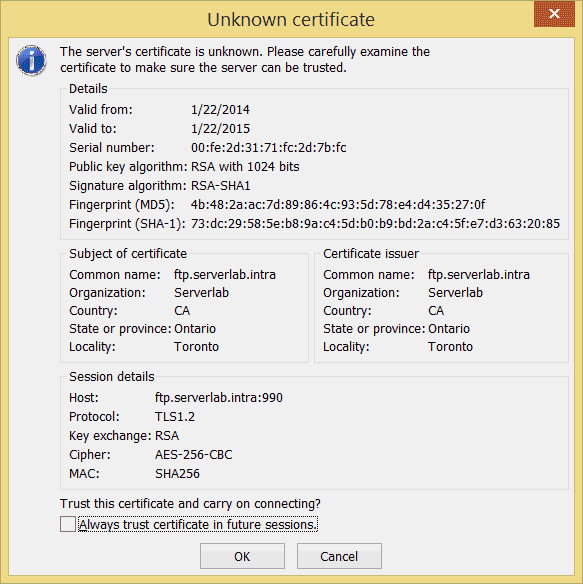
- If you used a self-signed certificate or some other form of untrusted certificate, you will be prompted with the following. Verify the validity of the certificate and click Ok, if you trust it.
Conclusion
Your users’ connections are now encrypted, protecting both their credentials and the data they tranfser. The scope of this tutorial was only to configure SSLTLS encryption, however, there is still plenty more to do.
Your next step should be locking down the users. You should define which users are allowed access and then deny. To increase security further, you should chroot the users, so that only their home directories are accessible while ftp’d in. All system directories will be removed from view, both blocking them and preventing sensitive files from being accessed.