Overview
Forward lookup zones host domains and are, essentially, flat databases with records that are used to translate hostnames into IP addresses. Each zone can be used as a management boundary for, as an example, a single domain or a domain and all of its child domains. A zone may even be a single child domain of another domain, so zone doesn’t necessarily need to host a parent and all of its children.
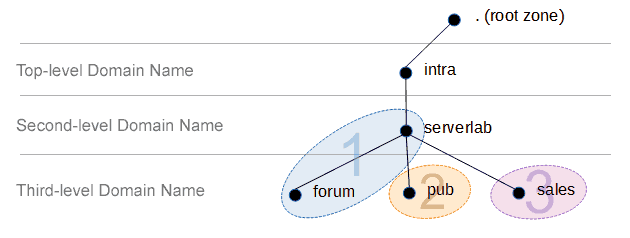
In the figure above there are three different forward lookup zones associated with serverlab.intra. The first one hosts all records for both serverlab.intra and forum.serverlab.intra. The second contains records only for pub.serverlab.intra. And finally, the third contains all records for sales.serverlab.intra. All four domains could have fit in a single zone, but for administrative reasons, it is sometimes easier to split them. Otherwise, you would end up having an extremely large zone file that would difficult to manage.
In this tutorial, we’ll focus on creating a single-domain forward lookup zone.
Create a New Forward Lookup Zone
- Open the Bind configuration file into a text editor.
nano /etc/named.conf
- Define a new domain. In our example, we’ll be creating a domain called serverlab.intra.
zone "serverlab.intra" IN { type master; file "serverlab.intra.db"; allow-query { any; }; }; - The options set in the above configuration do the following:
type Defines the role of this server for the zone. I’ve set it to Master, which means this server is the authoritative owner of the zone. If this were the second server to host the zone, it would be set to slave. A slave is allowed to host the zone’s database, but in only in read-only. file The name of the zone’s database file. Unless an absolute path is included, the file will need to be in the directory set using the directory option at the top of the Bind configuration file. By default, all files for CentOS are kept in /var/named. allow-query This option defines which hosts or subnets are allowed to query this server for the zone. I’ve set any which, as the name suggests, allows anyone to query this zone. - Save your changes and exit the text editor.
- The next step is to create the database file. Follow the instruction in the next section to learn how it’s done.
Create the Zone’s Database File
A Bind zone file is a plain ASCII text file with written records for a domain or entire zone. The start of the zone contains what is called a Start of Authority record (SOA). This record contains details about which DNS server owns (has authority of) the domain, as well as defining the version, default time-to-live settings, and who the primary contact is. A description of the configurable values set in the SOA record is listed in the table below.
- Create the zone’s database file. In our example, our file name will be serverlab.intra.db.
nano /var/named/serverlab.intra.db
- The top of the of file is where we set what is called the Start of Authority. Add the following lines.
@       IN SOA  ns01.serverlab.intra. admins.contoso.intra. (
                                2014030801      ; serial
                                        1D      ; refresh
                                        1H      ; retry
                                        1W      ; expire
                                        3H )    ; minimum
We do the following stuff.
@ The first value is the fully qualified domain name of the zone. The ‘@’ character is an alias for the domain name, which was defined in the Bind configuration file, to save admins from having to type the entire name. IN Sets the adjacent record type as Internet. SOA This is the domain record for the zone’s Start of Authority. It defines who the authoritative name server is, contact info for the administrator, and a few other values. ns01.serverlab.intra. The fully qualified domain name of the authoritative name server for the zone. admin.serverlab.intra. The email account of the administrator of the zone. The @ character is replaced by a period. Serial The serial number of version number of the zone file. This value is essential for secondary DNS servers who keep a replica of the zone and need to know if changes have been made. Refresh How often a slave (secondary) Bind DNS server should do a zone transfer from the master (primary) server. Retry How often a slave should retry a failed zone transfer. Expire The duration a slave (secondary) server should answer client query requests after it lost contact with the master (primary) server. Minimum The default time-to-live value each record will have, unless specified otherwise by a record. - Add the name server records for the domain. Every zone requires at least one name server.
@ NS ns01.serverlab.intra.
@ The ‘@’ character is an alias for the domain name, which was defined in the Bind configuration file. The NS record requires this or the fully-typed out domain name of the zone. NS Sets the record as a Name Server record/ ns01.serverlab.intra. The fully qualified domain name of the name server. - Each name server record needs a Host record. Clients require this for them to resolve the IP address of the name server. Add the following line to the file.
ns01 IN A 192.168.1.20
- Save your changes and exit the fext editor.
- Make sure Bind has permission to read the zone file.
chown named:named serverlab.intra.db
- Use named-checkzone to verify that there are no errors in the zone file.
named-checkzone serverlab.intra serverlab.intra.db
- Either restart Bind or ask it to reload the configuration files and zone databases.
service named restart
Register Hosts Records into the Domain
With our first domain defined in the forward lookup zone we created above, we can now start populating it with records.
- Open the zone’s database file into a text editor.
nano /var/named/serverlab.intra.db
- After the SOA and NS records, add the Address (Host) records for your servers. We’re going to add three servers, as an example.
server1                 IN      A       172.30.1.101
server2                 IN      A       172.30.1.102
server3                 IN      A       172.30.1.103
- Save your changes and exit the text editor.
- Have Bind reload the zone.
service bind reload
Conclusion
We have created a forward lookup zone to host one of our domains. Any client pointing to the name server hosting the domain can now resolve names registered in it.
Tutorials in this Series
- How to Deploy a CentOS 6 BIND DNS Server
- How to Add Forward Lookup Zones to Bind
- Register DNS Records into a Bind Domain
- How to Add Reverse Lookup Zones to Bind
- How to Configure Logging in Bind

