Overview
WordPress is by far the most popular content management system used by amateur and professional bloggers alike. The platform is easily customized and expanded via plugins, widgets, and themes to custom craft your own user experience. The purpose of this article is to show how easy creating a development environment on your Mac can be.
By choosing to use Docker for your development environment we benefit from having an environment that can be stood up and worked on instantly, without requiring enormous system resources. The gains in development time are one of the reasons Docker and containers have become as popular as they are today.
Docker isolates processes from the rest of system. Much like virtualization does, except it has a much lighter footprint. Docker is an ideal candidate for developing and testing on your local machine. With Docker we are able to develop directly to an Ubuntu, CentOS or other Linux distribution live, all without having to set up a physical server or create a virtual server, where we would have to install the operating system, configure it, and then prepare it for hosting our development environment.
Docker itself can be used to create our test environment, however, we are going to use Docker Compose to define our test environment and quickly stand up and bring down our development environment.
Installing Brew on OSX
The package manager of choice when running OSX is Brew. It allows us to quickly install dependencies for application development. So, before we can start creating our development environment we’ll need to install Brew.
- Open a new Terminal window.
- Execute the following command:
/usr/bin/ruby -e "$(curl -fsSL https://raw.githubusercontent.com/Homebrew/install/master/install)"
Install Docker
We’ll have to navigate to Docker’s website to download the binary file that installs Docker.
Install Docker Compose
- Open a Terminal window.
- Using Brew, install Docker Compose.
brew install docker-compose
Docker Pull latest MySQL and WordPress images
Nowadays you can usually find an official Docker container for everything. This allows us to focus on development rather than creating our own containers from scratch. To prepare our environment we will pre-download the two images we’ll need for WordPress development — WordPress and MySQL.
- Open a new Terminal window.
- Pull the latest WordPress image.
docker pull wordpress
- Pull the latest MySQL image.
docker pull mysql
Create Docker Development Environment
We’ll need a location to store our Docker configuration, separate from where we are developing our themes and plugins. Create a new directory that will be used to store files related to your Docker development environment.
- Open a Terminal window.
- Create a new project directory for our Docker environment. For example, ~/Projects/WP_Development.
mkdir -p ~/Projects/WP_Development
- Navigate to the newly created directory.
cd ~/Projects/WP_Development
- Create a new file called docker-compose.yml.
- Open the newly created docker-compose.yml into a text editor or IDE, and then define your development environment.
- Add the following contents.
web: image: wordpress links: - mysql environment: - WORDPRESS_DB_PASSWORD=super_secret_password ports: - "8081:80" volumes: - ~/Projects/Wordpress/plugins/myplugin:/var/www/html/wp-content/plugins/myplugin - ~/Projects/Wordpress/themes/serverlab:/var/www/html/wp-content/themes/serverlab mysql: image: mysql:5.7 environment: - MYSQL_ROOT_PASSWORD=super_secret_password - MYSQL_DATABASE=wordpress - The above configuration creates a Web instance that will run WordPress. It links with a second instance, called mysql that runs MySQL version 5.7. We expose port 80 of the Web instance and map it to the local hosts (your Mac) port 8081. Volumes allow us to add directories from our host to the docker image, which is essential for live developing WordPress plugins and themes.
Running the Development Environment
We are finally able to start our development environment. Docker compose makes this process very easy, as we can simply tell docker compose to up our environment.
Starting the Environment
docker-compose up
The above command will run docker-compose in the foreground. If you would rather run it as a background process, you use the -d flag.
docker-compose up -d
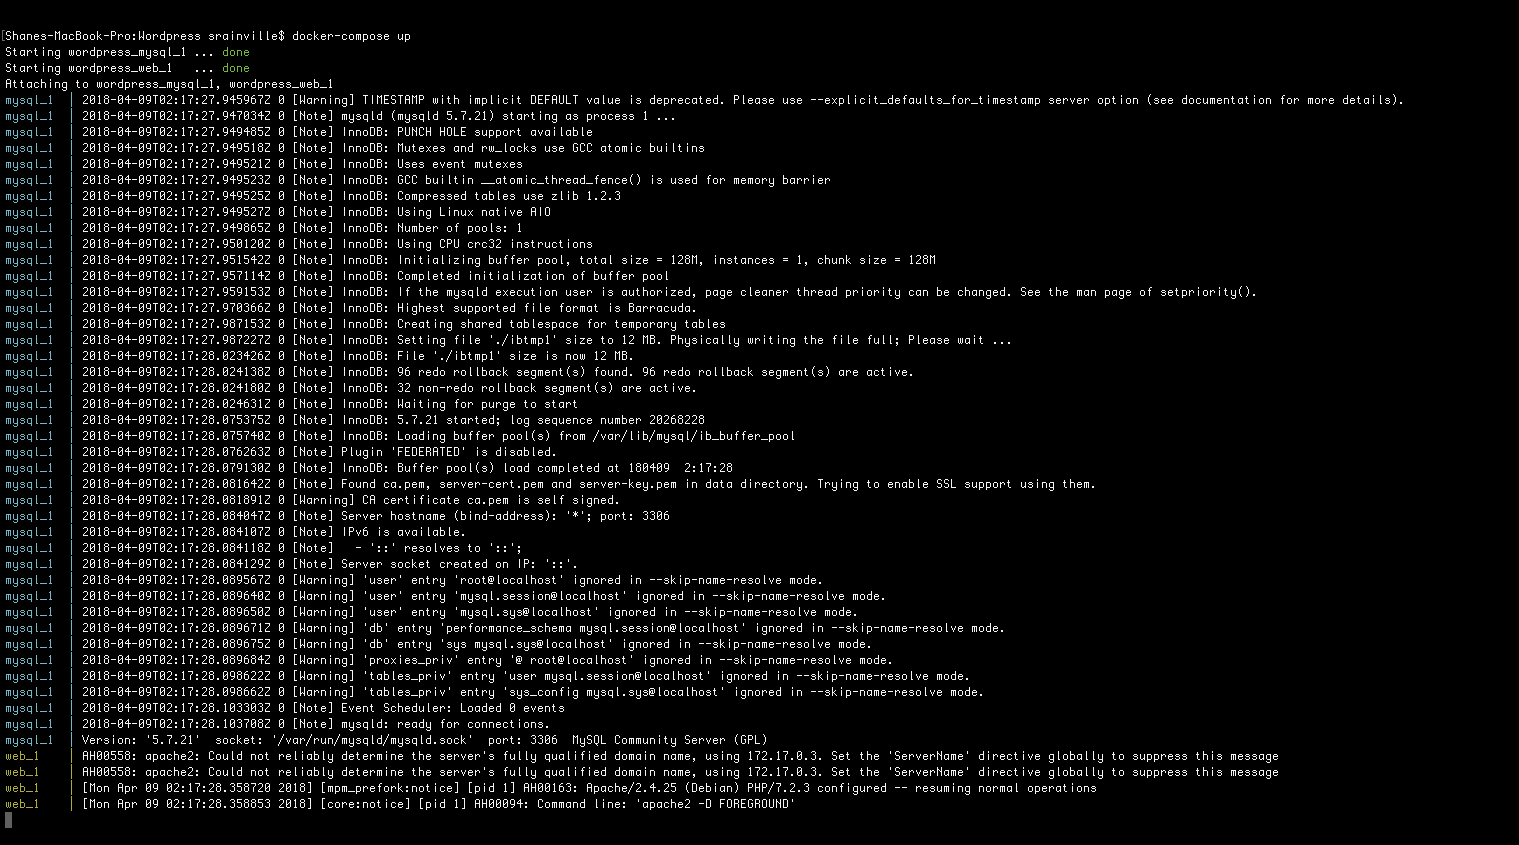
If all went well your docker-compose output will resemble the following.
You should now be able to navigate to your WordPress instance using your web browser. In our example we use port 8080, so we would open our browser to http://localhost:8080. Assuming the database instance and web instance started successfully you will be greeted by the WordPress config page.

Stopping the Environment
docker-compose stop
Destroying the Environment
docker-compose rm
List running instances
docker-compose ps