Wouldn’t it be nice if we could just drop in a database server into our environment without much thought? Unfortunately, no single deployment will ever meet every expectation in every environment for every application. As an administrator, the first thing we must do, well before procuring any hardware, is understanding the expected workload and availability that will be required for whatever service we’re providing a database for.
Will this new service be accessed 24/7 or is it only used once a week? Will it be processing thousands of transactions a minute; constantly updating, adding, deleting, and reading records? How large will the average transaction be?
Objectives
- Deploy a single MySQL server to handle an active, multi-user content management system.
- Create a management network interface.
- Bond two network interfaces for mysql traffic to increase network availability.
- Configure the storage for increased performance.
- Bind SSH traffic to the management network interface.
- Bind MySQL traffic to the mysql network interface.
1. Preparing the Storage
Having your operating system, database data, and database logs on the same disk may work for extremely light-weight applications, it will more than certainly flood the disk with I/O for medium to heavy-weight applications. By separating the storage for these areas we can spread the I/O across multiple disks.
Our lab is going to use the following hard drive configuration. The drive sizes are only informational and you shouldn’t base your deplyoment on them. We’re using RAID 1 for our system disk to protect our system files with a mirror copy. The data and log drives are RAID 10 for performance and redundancy.
| Disk | Purpose | Interface | Device File | Size | RAID |
| 1 | Operating System | SCSI | /dev/sda | 70 GB | RAID1 |
|---|---|---|---|---|---|
| 2 | Database Data | SCSI | /dev/sdb | 100 GB | RAID10 |
| 3 | Database Logs | SCSI | /dev/sdc | 100 GB | RAID10 |
- Create a directory for the database filesystem mounts.
mkdir -p /Databases/data
mkdir /Databases/logs
- Create a new partition on the second drive using fdisk. Depending on the type of disk installed in the server the device file name will differ.
fdisk /dev/sdb
- Type n and then press Enter, to create a new partition.
- When prompted, type p for primary and then press Enter.
- When prompted, type 1 for partition number 1 and then press Enter.
- Accept the default settings for First cylinder and Last cylinder.
- Type w to save our new partition.
- Repeat steps 2-7 for disk 3 (/dev/sdc).
- Create the filesystem on sdb‘s newly created partition.
mkfs.ext4 /dev/sdb1
- Create the filesystem on sdc‘s newly created partition.
mkfs.ext4 /dev/sdc1
- Now that our file systems are created, we need to edit fstab in a text editor to enable auto-mount.
vi /etc/fstab
- Add the following lines to fstab to auto-mount disk 2 to /Databases/data and to mount disk 3 to /Databases/logs on boot.
# MySQL Data and Logs
/dev/sdb1       /Databases/data      ext4     defaults     1 2
/dev/sdc1       /Databases/logs      ext4     defaults     1 2
- Save your changes and exit the text editor.
- Reload the mount points to mount the two we just created.
mount -a
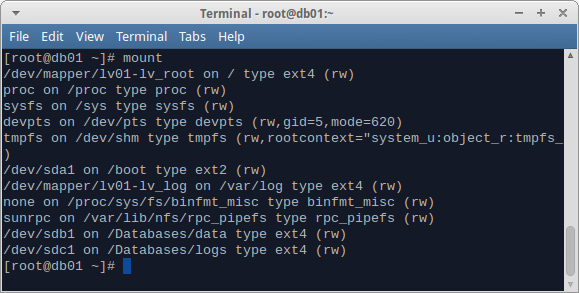
- Verify the two drives are mounted to their mount points by running mount.
mount
- If the drives are mounted, you will see the following lines in the output generated by mount.
/dev/sdb1 on /Databases/data type ext4 (rw)
/dev/sdc1 on /Databases/logs type ext4 (rw)
2. Network Interfaces
To protect against downtime due to network interfaces failures, a bond should be created between at least two interfaces in an active/passive configuration. This way the server can still process database requests if one the ports goes bad or a cable is unplugged.
An extra interface should be added for server management. This allows an admin to manage the server without being affected by database traffic and vice-versa.
| NIC | MAC Address | Device Name | Purpose | IP Address |
| #1 | 00:0C:29:4C:4E:6C | ETH0 | Management | 172.30.0.20 |
|---|---|---|---|---|
| #2 | 00:0C:29:4C:4E:76 | BOND0 | Database | 172.30.1.143 |
| #3 | 00:0C:29:4C:4E:76 |
As you can see in the above table, I have included the MAC addresses of each of my network interface cards. This address is crucial in ensuring the interfaces are explicitly assigned to the correct device file. Make not of this information in your configuration. It will be needed for the next tasks.
2.1 Create the Management Network Interface (eth0)
- Navigate to /etc/sysconfig/networking and create a new file called ifcfg-eth0.
cd /etc/sysconfig/network-scripts
touch ifcfg-eth0
- Open ifcfg-eth0 into a text editor.
vi ifcfg-eth0
- Add the following lines.
DEVICE=eth0
HWADDR=00:0C:29:4C:4E:6C
IPADDR=172.30.0.20
NETMASK=255.255.255.0
GATEWAY=172.30.0.1
ONBOOT=yes
BOOTPROTO=none
USERCTL=no
- Save your changes and exit the text editor.
- Restart the interface to apply the settings.
ifdown eth0
ifup eth0
2.2 Create the Database Access Network Interface (bond0)
- Navigate to /etc/sysconfig/networking and create a new file called ifcfg-bond0.
cd /etc/sysconfig/network-scripts
touch ifcfg-bond0
- Open ifcfg-bond0 into a text editor.
vi ifcfg-bond0
- Add the following lines.
DEVICE=bond0
IPADDR=172.30.1.143
NETMASK=255.255.255.0
ONBOOT=yes
BOOTPROTO=none
USERCTL=no
BONDING_OPTS="miimon=80 mode=1"
- Save your changes and exit the text editor.
- Create a new script for Ethernet interface #2.
touch ifcfg-eth1
- Open ifcfg-eth1 into a text editor.
vi ifcfg-eth1
- Add the following lines.
DEVICE=eth1
HWADDR=00:0C:29:4C:4E:76
TYPE=Ethernet
ONBOOT=yes
BOOTPROTO=none
USERCTL=no
MASTER=bond0
SLAVE=yes
- Save your changes and exit the text editor.
- Create a new script for Ethernet interface #3.
touch ifcfg-eth2
- Open ifcfg-eth2 into a text editor.
vi ifcfg-eth2
- Add the following lines.
DEVICE=eth2
HWADDR=00:0C:29:4C:4E:76
TYPE=Ethernet
ONBOOT=yes
BOOTPROTO=none
USERCTL=no
MASTER=bond0
SLAVE=yes
- Save your changes and exit the text editor.
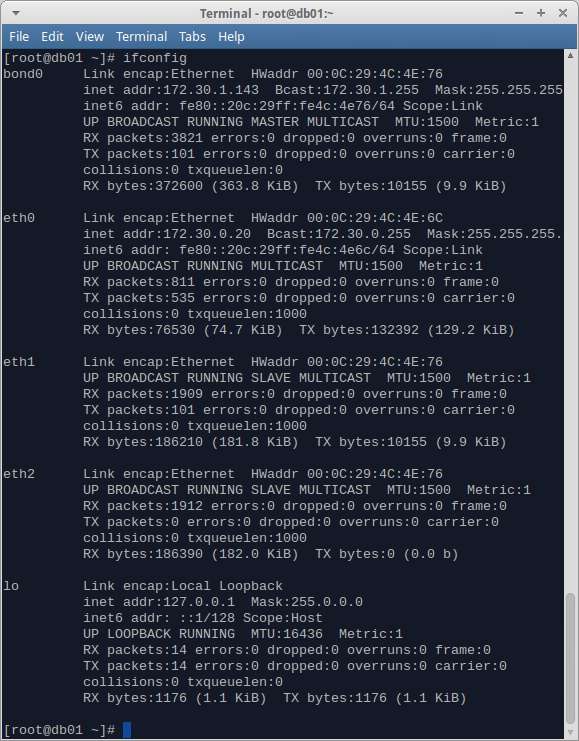
- Bring up the new bond0 interface
ifup bond0
- Run ifconfig to verify the interface is up and configured properly. The output should like like the following, provided you are following along with our exact IP settings.
2.3 Routing Workaround
Our server is now multi-homed. We can connect to the management interface from any network in our environment, but we will only be capable of connecting to the database interface when connected to its network, 172.30.1.0/24. The interface doesn’t have a default route, therefore, it cannot respond back to requests made from other networks.
We can solve this routing issue by creating an IP routing table for each interface.
- Create a routing table for interface bond0 named MySQL.
echo -e "200 MySQL" >> /etc/iproute2/rt_tables
- Explicitly define the routing table and default gateway for interface bond0.
echo "default table MySQL via 172.30.1.1" > /etc/sysconfig/network-scripts/route-bond0
- Create a rule that tells bond0 to use table MySQL for all exiting traffic.
echo "from 172.30.1.143 table MySQL" > /etc/sysconfig/network-scripts/rule-bond0
- Restart the networking service to apply our changes.
service network restart
2.4. Binding SSH to the Management Interface
We want to force everyone to SSH into our server through the management interface so as to not interfere with the database query traffic.
- Open SSH’s configuration file into a text editor.
vi /etc/ssh/sshd_config
- Add or modify the ListenAddress option and point it to our management IP.
ListenAddress 172.30.0.20
- Save your changes and exit the text editor.
- Restart the SSH daemon to apply our changes.
service sshd restart
3. Install and Configure MySQL Server
With the network and storage prepared, we can finally move onto installing MySQL.
- Install MySQL Server
yum install -y mysql-server
- Change the user and owner of the Databases directory and its child directories to mysql.
chown mysql:mysql -R /Databases
- Copy MySQL’s data directory contents and its security context to the new directory.
cp -R -p /var/lib/mysql/data/* /Databases/data
- Open MySQL’s configuration file into a text editor.
vi /etc/my.cnf
- Modify MySQL’s configuration file to explicitly set the new data directory to our new location.
datadir=/Databases/data
- Bind MySQL to our database network device, bond0. We don’t want connections to be allowed over our management network interface.
bind-address=172.30.1.143
- Start the MySQL daemon.
service mysqld start
- If all was done correctly, MySQL should start. If it doesn’t, check the MySQL log file to see why startup failed. The most likely causes are user/group ownership of the newly created MySQL directories and SELINUX context problems. The default MySQL log file is /var/log/mysqld.


