Overview
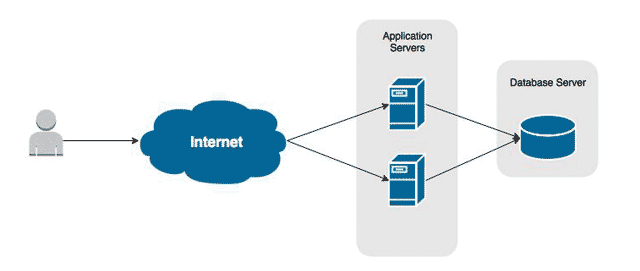
At the core of every typical web infrastructure is a web server and a database server. We begin our series by deploying each of these and configuring them for a WordPress installation.
Although many small blog sites host the application and database on a single box, we eventually expect a large amount of traffic, and segregating our roles early will allow us to scale out easier later on when needed.
Before You Begin
To follow along with this article you will need the following. The sizing used in this article are below.
- One server for the web server.
- One server for the database server.
Sizing the servers
The hardware configuration below is what we’ll be using in this tutorial. If you are familiar with Amazon AWS, you will notice they resemble T2.Micro instances. This sizing seems small, but it will do very well for WordPress sites with few only a few plugins and low traffic (less than 2500 unique visitors per day). However, with caching mechanisms and CDNs that will be introduced later in this series, we can easily quadruple, or more, that number without having to migrate to larger server instances.
| Name | Processors | RAM | STORAGE | Public IP | Private IP |
|---|---|---|---|---|---|
| DB01 | 1 | 1 GB | 8 GB | 172.30.0.40 | 192.168.5.40 |
| WEB01 | 1 | 1 GB | 8 GB | 172.30.0.50 | 192.168.5.50 |
When sizing your servers, keep in mind that no two applications are the same. These sizes may work well for a WordPress site with a few plugins. However, more complex application may require much more RAM, storage, or processing power.
Configuring the Database Server
Install MySQL
- Log onto your database server using an account with administrative rights.
- Update the repository mirrors.
sudo apt-get update
- Install MySQL Server.
sudo apt-get install mysql-server
- During the installation, you will be prompted to set the database server’s Root account password. Ensure it is complex.
Creating Your User Account
It is bad practice to do any basic administrative work using the Root account. This is especially true in teams. You should always create a separate account for each administrator who mill be manager the database server.
- Log onto the database server.
- Log into your MySQL server instance using the Root account.
- Create your user account.
GRANT ALL ON *.* TO 'john.doe'@'localhost' IDENTIFIED BY 'super-secure-password';
- Flush the load privileges to apply your changes.
FLUSH PRIVILEGES
- Exit MySQL
QUIT
Creating the WordPress User Account
As every user should have their own account, so should each application accessing your database server. WordPress will require an account that allows it to insert data, update data and delete data. It does not need rights to create users, create databases, drop users or drop databases. Allowing it to do so would be a serious security risk.
We only expect connections from our web server. We’ll want to create our WordPress’ account to only allow connections coming from the web server’s IP address. If your web server has two IP address – one for private access and one for public access – as our example does, you will want to only allow access from the private network.
- Log onto the database server.
- Log into your MySQL server instance using your admin account (create above).
- Create the WordPress database service account.
GRANT SELECT,INSERT,UPDATE,DELETE,INDEX,CREATE ON WordPress.* TO 'wpsite_srv'@'192.168.5.50';
- Flush the load privileges to apply your changes.
FLUSH PRIVILEGES
- Exit MySQL
QUIT
Configuring the Web Server
Before moving ahead, build two servers and install Ubuntu Server 14.04 on them.
Installing Apache and PHP
Apache is what we’ll be using for our web server, and PHP will be required to run WordPress. The following section will describe how to install and configure each package.
- Log onto your Ubuntu server using an account with administrative rights.
- Update the repository mirrors.
sudo apt-get update
- Install Apache2 and PHP
sudo apt-get install -y apache2 php php-MySQL php-xml php-gd
Configuring Apache for WordPress
The default configuration for Apache works just fine. However, there are certain features that won’t work without some modifications (permalinks).
- Open Apache’s configuration file into a text editor.
sudo nano /etc/apache2/apache2.conf


