Overview
HAProxy is a light-weight load balancer that is quick and easy to setup. Although it lacks a lot of the functionality found in enterprise balancers from companies like F5 and Citrix, it’s still a powerful server freely available on almost any Linux distro. I have used in many projects with low budgets that required load balancing.
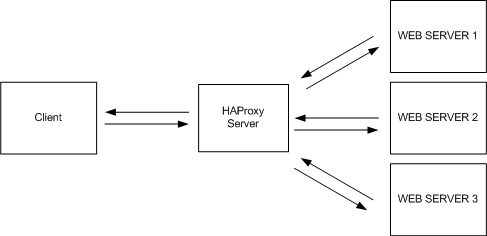
As the name suggests, all balanced traffic is proxied through HAProxy. Therefore, when designing a load balance solution around it, it’s important to understand that all network traffic flows through it – from the incoming requests to outgoing responses.
You will need to size the network of the HAProxy server to be high enough to handle all traffic. When balancing a WordPress blog, for example, it’s unlikely that a single server will consume the entire bandwidth of your an HAProxy on a 1GbE connection. However, if the servers being balanced are serving large media movie files, for example, you’re HAProxy server is going to require a rather large network pipe to handle the requests for all of the backend servers. It certain doesn’t scale well at all when balancing large data, highly-accessed data.
Create Virtual IP
The virtual IP is the IP address users will use to connect to the load balanced application. This is the address you will register in DNS. In our example, the virtual IP will be assigned to ETH0 – our only network interface on the HAProxy server. In production it would be wise to separate balanced traffic and server management traffic onto different network interfaces.
- Open the network configuration file into a text editor.
sudo nano /etc/network/interfaces
- Under the existing network interface, add a new interface using the same name with a colon (:) appended to the end. For example, the interface we’re attaching the virtual IP to is named ETH0. Therefore, our new virtual interface will be named ETH0:1.
# This file describes the network interfaces available on your system and how to activate them. For more information, see interfaces(5). # The loopback network interface auto lo iface lo inet loopback # The primary network interface auto eth0 iface eth0 inet static address 172.30.0.100 netmask 255.255.255.0 network 172.30.0.0 broadcast 172.30.0.255 gateway 172.30.0.1 # HAProxy Virtual IP 1 auto eth0:1 iface eth0:1 inet static address 172.30.0.101 netmask 255.255.255.0 - Save your changes and exit the text editor.
- Bring the new interface up.
ifup eth0:1
- Use ifconfig eth0:1 to verify the interface is up. The output should look similar to the following example.
eth0:1     Link encap:Ethernet  HWaddr 00:0c:29:b6:f3:e8
           inet addr:172.30.0.101  Bcast:172.30.0.255  Mask: 255.255.255.0
           UP BROADCAST RUNNING MULTICAST  MTU:1500  Metric:1
Installing HAProxy
The HAProxy package is available in the Ubuntu 14 repository. It can be installed by using aptitude.
- Log onto the server using an account that has root privileges.
- Install HAProxy.
sudo apt-get install haproxy
- To enable the HAProxy service daemon, open /etc/defaults/haproxy into a text editor.
sudo nano /etc/defaults/haproxy
- Set the Enabled value to 1.
# Set ENABLED to 1 if you want the init script to start haproxy
ENABLED=1
# Add extra flags here
#EXTRAOPTS="-de -m 16"
- Save your changes and exit the text editor.
Layer 4 Balancing (High Performance)
Layer 4 load balancing is the faster method of balancing a web application. Simply, it receives a request submitted to the virtual IP and forwards it to a backed server (one of the web servers being balanced, for example). Very little processing is done, since the request just gets forwarded.
The limitation of balancing using layer 4 is that all backend servers must be configured identically. Otherwise, the user experience will differ depending on whichever server the user get forwarded to.
- Open the HAProxy configuration file into a text editor.
sudo nano /etc/haproxy/haproxy.cfg
- Modify some of the values under the defaults section. More specifically, we need to ensure mode is set to tcp.
global log /dev/log local0 log /dev/log local1 notice chroot /var/lib/haproxy user haproxy group haproxy daemon defaults log global mode tcp option tcplog option dontlognull contimeout 5000 clitimeout 50000 srvtimeout 50000 errorfile 400 /etc/haproxy/errors/400.http errorfile 403 /etc/haproxy/errors/403.http errorfile 408 /etc/haproxy/errors/408.http errorfile 500 /etc/haproxy/errors/500.http errorfile 502 /etc/haproxy/errors/502.http errorfile 503 /etc/haproxy/errors/503.http errorfile 504 /etc/haproxy/errors/504.http - Create a new frontend section for your application. This is where we define the virtual IP of our cluster and which backend server cluster to use (which we define below). You can name the frontend whatever you want, as long as each frontend has a unique name.
global log /dev/log local0 log /dev/log local1 notice chroot /var/lib/haproxy user haproxy group haproxy daemon defaults log global mode tcp option tcplog option dontlognull contimeout 5000 clitimeout 50000 srvtimeout 50000 errorfile 400 /etc/haproxy/errors/400.http errorfile 403 /etc/haproxy/errors/403.http errorfile 408 /etc/haproxy/errors/408.http errorfile 500 /etc/haproxy/errors/500.http errorfile 502 /etc/haproxy/errors/502.http errorfile 503 /etc/haproxy/errors/503.http errorfile 504 /etc/haproxy/errors/504.http ::HL::frontend webapp1 ::HL:: bind 172.30.0.101:80 ::HL:: default_backend webapp1-servers - Create a backend for the frontend just created. This is where we define the servers used in our cluster. We also set the balancing algorythm here, too, as well as some other optional options.
global log /dev/log local0 log /dev/log local1 notice chroot /var/lib/haproxy user haproxy group haproxy daemon defaults log global mode tcp option tcplog option dontlognull contimeout 5000 clitimeout 50000 srvtimeout 50000 errorfile 400 /etc/haproxy/errors/400.http errorfile 403 /etc/haproxy/errors/403.http errorfile 408 /etc/haproxy/errors/408.http errorfile 500 /etc/haproxy/errors/500.http errorfile 502 /etc/haproxy/errors/502.http errorfile 503 /etc/haproxy/errors/503.http errorfile 504 /etc/haproxy/errors/504.http frontend webapp1 bind 172.30.0.101:80 default_backend webapp1-servers ::HL::backend webapp1-servers ::HL:: balance roundrobin ::HL:: mode tcp ::HL:: server webserver1 172.30.0.102 ::HL:: server webserver2 172.30.0.103 ::HL:: server webserver3 172.30.0.104 ::HL:: server webserver4 172.30.0.105 - Save your changes and exit the text editor.
- Start or restart HAProxy to apply our changes.
sudo service haproxy restart