Overview
In this tutorial, you will learn how to mount SMB shares on CentOS 7. You will be guided through the process for both desktop and server installations of the operating system.
CentOS provides support for mounting Microsoft CIFS or SMB shares. Not just limited to shares hosted from Microsoft Windows, we can also mount shares from any network device that uses the SMB protocol. This includes just about any NAS device on the market.
If you understand how to mount SMB shares on earlier versions of Red Hat Enterprise Linux or CentOS, the instructions are identical.
Share Configuration
For this tutorial, I prepared a share named Core Library on a Windows Server 2012 R2 server that is a member of an Active Directory domain.
| Hostname | Operating System | Share Path | SMB Version |
|---|---|---|---|
| WS12FS01 | Windows Server 2012 R2 | \\WS12FS01\libraries\core | 2.0 |
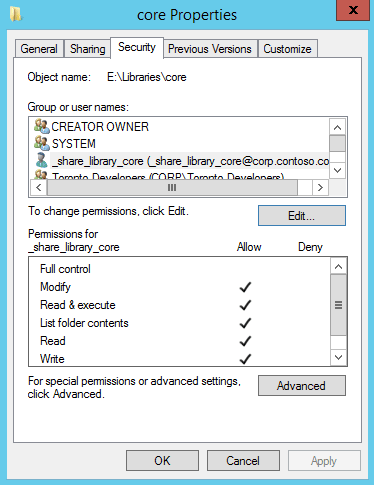
For the share permission on WS12FS01, we grant Full Control to Everyone. Don’t be fooled into thinking this is insecure. Although everyone has access to the share, the NTFS permissions on the volume hosting the share overrule the share permissions. By leaving Everyone and granting full control, we save our selves work by only having to manage permissions on the file system itself.

For the NTFS permissions, we created an Active Directory account named _share_library_core and granted it Modify, Read & Execute, List folder contents, Read, and Write. The account will be used when we mount the share onto CentOS 7.
We use an Active Directory account in this tutorial as an example of how someone would accomplish this in an enterprise environment.
However, an Active Directory account is not required. As long as the CentOS server has an account that can authenticate successfully on the host publishing the share, it doesn’t matter where the account actually exists – in Active Directory or locally on the file server itself.
Preparing CentOS 7 for Mounting SMB Shares
A default CentOS 7 build will not be able to mount SMB\CIFS shares, unless you customized the install. We’ll need to install a package onto the server that allows it to understand the SMB protocol.
- Install the cifs-utils package from the default CentOS yum repository.
yum install cifs-utils
- Next, we need an account on the CentOS server that will map to the Windows account granted permission to the SMB share, _share_library_core. We’ll create a service account named svc_library_core with a user id (UID) of 5000.
useradd -u 5000 svc_library_core
- We also want a group on the CentOS server that will map to the share. This group will contain all of the Linux accounts that will need access to the share. Our account will be called share_library_core and it will have a group id (gid) of 6000.
groupadd -g 6000 share_library_core
- Finally, add any Linux accounts that require access to the SMB share to the newly created Linux group. I have an existing account named user1 that I will add to the share_library_core group.
usermod -G share_library_core -a user1
Mounting an SMB Share
We are now ready to mount our SMB share. In the example below, we temporarily mount the SMB share onto our CentOS server. The share will remain mounted until the server is rebooted.
- Create a directory to mount the SMB share into. We’ll mount the share in a directory called lib_core.
mkdir /lib_core
- Using the mount.cifs command, mount the SMB share into lib_core using the Active Directory user account _share_library_core. We need to map the UID of our svc_library_core account (5000) and the gid of our share_library_core group (6000) to the SMB share.
mount.cifs \\\\WS12FS01\\libraries\\core /lib_core -o user=_share_library_core,pass="secret",uid=5000,gid=6000
The extra backslashes (\) are not typos. Backslashes are used to escape certain characters. Because of this, we have to double up on them when accessing Microsoft shares.
- If no errors appeared, the share should successfully be mounted. The verify this, use the df command or the mount.
Hiding SMB USer Credentials
In the example above, we’re forced to enter the username and password into the command-line. This is a major security issue, as someone could browse your bash history to obtain the credentials, or they can see them while you type them in. Thankfully, there’s a way to address this problem by using a credentials file.
- If not Root, SU into the Root account.
su - root
- Create a credentials file in Root’s home directory. I typically create this file in a sub-directory in Root’s home, for organizational reasons. But for this example, I will place it in /root.
touch /root/creds_smb_library_core
- Modify the file’s permissions so that only the Root account is granted read permissions. No groups or other users should have access to the file.
chmod 0600 /root/creds_smb_library_core
- Open the file in a text editor. I like using VI, but you can use whichever you prefer.
vi /etc/root/creds_smb_library_core
- Add the following lines to the file. Remember to replace the username and password values so that they match your environment.
username=_share_library_core
password=secret
TABLE2 – Credential file options username The Windows or Active Directory username granted permissions to the share on the Windows file server. password The password given to the username - Save your changes to the credential file and exit the text editor.
- Mount the SMB share. However, instead of using the user and pass options, we instead use the credentials option and point to our credentials file.
mount.cifs \\\\WS12FS01\\libraries\\core /lib_core -o credentials=/root/creds_smb_library_core,uid=5000,gid=6000
Persistent SMB Mounts using FSTAB
The downfall of the examples above is that the mounts are only temporary – the will not remount at system boot. The make the mount permanent we need to add it the fstab.
- Open /etc/fstab into a text editor.
vi /etc/fstab
- Add the following line to your fstab. Remember to replace the values with those that match your environment.
\\\\WS12FS01\libraries\\core /lib_core cifs credentials=/root/creds_smb_library_core,uid=5000,gid=6000 0 0
- Save your changes and exit the text editor.
- The SMB share will mount the next time the CentOS server is rebooted. To mount the share immediately, use the mount command.
mount -a