Overview
HAProxy is a free and open-source Linux application used for load balancing network traffic. This tutorial will guide you through deploying it for both simple web applications and large, complex web sites.
Load Balancing Concepts
Depending on the complexity of your needs, balancing can be accomplished many ways using different techniques. One of the first things you’ll need to identify is do use layer 4 or layer 7 balancing. Each is a solution for different needs, so it’s very important to understand your actually requirements before making a decision on a load balancer configuration.
Layer 4
The higher you are on the network stack layer, the faster you will be able to process requests. The caveat is that the extra performance gain comes at the cost of feature and ability loss. Ignoring features you may find in advanced enterprise-ready load balancers, you can’t beat the performance of a layer 4 balancing. It works by modifying the destination IP and MAC address part of every packet’s header to forward it to one of the available nodes. This approach is accomplished by using very little processing.
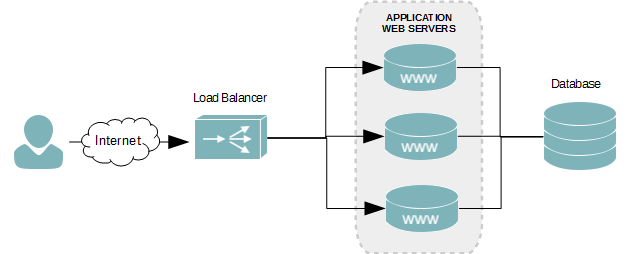
The biggest downside to this method of balancing is your nodes must host every component of your application (PHP, Java, CSS, Javscript, IMGs, etc), and the application files on each node must be the exact same versions. Otherwise, you’re users’ experience will differ each time they access your website.
Layer 4 balancing is ideal for small websites or those with few complexities.
Layer 7
Layer 7 balancing may require more horsepower to process, but what it offers in return for large and complex websites is worth the extra CPU time. This type of balancing allows you to separate every component onto it’s own server, and it does so transparently to the user. Another benefit is being able to move heavily accessed areas of your website onto separate servers. For example, maybe you’re hosting a news website that also has forums to allow users to discuss things. Given enough popularity, the forum may cause other areas of your website to be sluggish or become inaccessible. Using layer 7, you could separate your forum onto its own server or server group to allow you to scale it out.
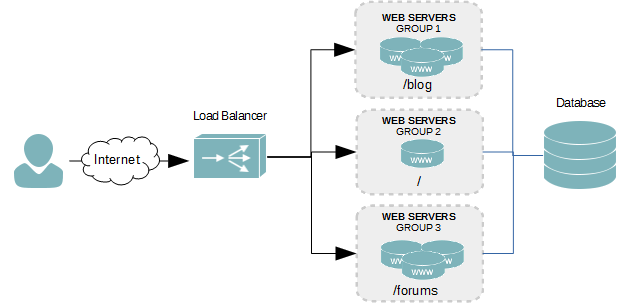
Layer 7 works by analyzing the application request part of every packet, and then matching it against a set of policies or rules. For a web server, it looks at the HTTP request to identify the action and destination URI. Using our news website with a forum example above, if an HTTP GET or POST request is submitted starting with /forum, the traffic will be routed to the servers hosting the forum application, allevating stress from the news posting part of the site.
Installing HAProxy
HAProxy isn’t available in the default repositories for CentOS or Red Hat. In order for us to be able to install it, we need to either compile it from source (preferred) or add the EPEL repository to our server and install it using Yum.
Installing from EPEL
- Download the EPEL repository RPM.
wget http://dl.fedoraproject.org/pub/epel/6/x86_64/epel-release-6-8.noarch.rpm
- Install the EPEL repository RPM to add its Yum configuration file to your server.
rpm -ivh epel-release-6.8.noarch.rpm
- Install HAProxy
yum install haproxy
Installing from Source
This method is best for optimizing the binaries for your hardware. However, you’ll need compilers and development libraries installed. It’s recommended you compile the binaries on a separate computer and then move the binaries over to your server.
- Install development tools.
- Download the latest source version of haproxy. At the time of this writing, version 1.4.24 was out.
wget http://haproxy.1wt.eu/download/1.4/src/haproxy-1.4.24.tar.gz
- Untar the downloaded file.
tar xvzf haproxy-1.4.24.tar.gz
- Navigate into new haproxy directory.
cd ./haproxy-1.4.24
- Compile HAProxy. To optimize the binaries for your hardware, there are a few options you should specify. Use one of the following, depending on what you are running.
- Compile for Linux kernel 2.6.28 or later and optimize the binaries for the install CPU architecture.
make TARGET=linux2628 ARCH=native
- Compile for Linux kernel 2.6 or later and optimize the binaries for i386 CPU architecture.
make TARGET=linux26 ARCH=i386
- Compile for Linux kernel 2.6.28 or later and optimize the binaries for the install CPU architecture.
- Install the newly compiled binary.
make install
- Copy the haproxy binaries to /usr/sbin
cp /usr/local/sbin/haproxy /usr/sbin/
- Copy the example init file for haproxy to the init directory.
cp /root/haproxy-1.4.24/examples/haproxy.init /etc/init.d/haproxy
- Modify the file permissions of the init file.
chmod 755 /etc/init.d/haproxy
- Create a user for haproxy.
useradd --system haproxy
- Create an haproxy /etc directory to store configuration files.
mkdir -p /etc/haproxy
Configuring HAProxy
There are a few base configuration that should be set before we move into creating load balance clusters. If you installed HAProxy using Yum, a lot the defaults are preset. If you compiled from source, there is no configuration file and you need to create one.
Base Configuration
- Open the existing file or create a new haproxy configuration file.
vi /etc/haproxy/haproxy.cfg
- The first section of the configuration file is for global properties. The following is an example of a basic configuration.
global
        user    haproxy
        group   haproxy
        nbproc  1
user The user account from the local passwd file HAProxy will run as. group The group that HAProxy will run as. nbproc The number of processes HAProxy will run in. It is strongly recommended that you set this value to 1. - Below the global section there can be a default section. This defines default configurations for our groups.
defaults
        mode http
        timeout connect 5000ms
        timeout client 50000ms
        timeout server 50000ms
Mode timeout connect The amount of time before a connection timesout. timeout client The amount of time before a client times out. timeout server The amount of time before our server times out. - Save your changes to the haproxy configuration file. We're now ready to move onto creating our layer 4 and/or layer 7 load balance clusters.
Conclusion
Our server is now configured to use HAProxy to load balance our application. However, we currently are not balancing anything. Use the tutorials below to continue configuring the type of load balancing your application requires.
Tutorials in this series: