Overview
Layer 7 load balancing allows you to separate your traffic onto different servers based on the content being requested for you website. You could, for example, forward all requests for static content – html, jpg, gif, css, etc. – to one cluster of servers, while forwarding all remaining requests to another cluster of servers. Another example would be having your main site on different servers than your forum, which has heavier traffic.
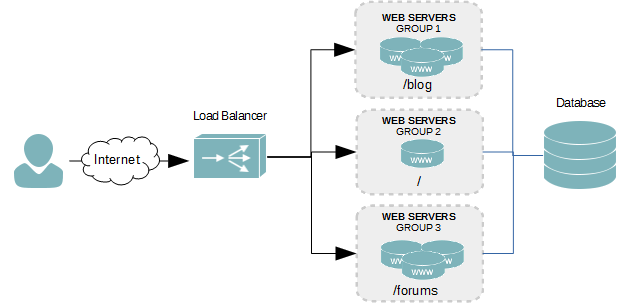
The figure below shows a request coming into the load balancer, by way of your website’s domain name, and then being forwarded to different clusters for anything matching /blog, /, or /forums. All three clusters connect to the same database backend.
To determine which group of servers to forward a request to, the load balancer must analyze the HTTP request of each packet coming to match it against rules. This requires some more CPU time as compared with layer 4 balancing, so you won’t get the same capacity or speed; however, for heavily accessed large websites or those with complex needs, the pros far out-weight the cons.
Create a Floating IP Address
A floating IP address is term used by most load balancers. It’s essentially an additional IP address added to a physical network interface. This isn’t absolutely necessary, as you can use the IP address of the load balancer instead. However, when you are balancing multiple different applications, it becomes a requirement.
- Create a new network interface by duplicating an existing one, and adding a colon (:) and a value of 0 to the end of the file name. We’re going to add the floating IP to our first interface in this tutorial.
cp /etc/sysconfig/network-scripts/ifcfg-eth0 /etc/sysconfig/network-scripts/ifcfg-eth0:0
- Open the new file into a text editor.
- Modify the interface’s name to change it from eth0 to eth0:0, as shown in the example below. Of course, if you were adding the floating IP to your second network interface, eth1, the name would instead by eth1:0. If we were adding a second floating IP address, we would increment the last value by one, making it eth1:1.
DEVICE=eth0:0
TYPE=Ethernet
ONBOOT=yes
NM_CONTROLLED=no
BOOTPROTO=none
IPADDR=172.30.0.30
PREFIX=24
IPV4_FAILURE_FATAL=yes
IPV6INIT=no
NAME="System eth0:0"
- Save your changes and exit the text editor.
- Restart the network services to initialize the floating IP.
services network restart
- Alternatively, you could just bring the physical interface down and then up again.
ifdown eth0
ifup eth0
- Verify that the new interface is online and assigned the floating IP by using the ifconfig command. The output should look similar to the example below.
eth0      Link encap:Ethernet  HWaddr 00:0C:29:E9:C0:05
          inet addr:172.30.0.25  Bcast:172.30.0.255  Mask:255.255.255.0
          inet6 addr: fe80::20c:29ff:fee9:c005/64 Scope:Link
          UP BROADCAST RUNNING MULTICAST  MTU:1500  Metric:1
          RX packets:27 errors:0 dropped:0 overruns:0 frame:0
          TX packets:32 errors:0 dropped:0 overruns:0 carrier:0
          collisions:0 txqueuelen:1000
          RX bytes:2316 (2.2 KiB)  TX bytes:3244 (3.1 KiB)

eth0:0    Link encap:Ethernet  HWaddr 00:0C:29:E9:C0:05
          inet addr:172.30.0.30  Bcast:172.30.0.255  Mask:255.255.255.0
          UP BROADCAST RUNNING MULTICAST  MTU:1500  Metric:1
Create Frontend Server
The frontend server is what listens for incoming connections on a specific IP addresses for a specific load balancer server group. For layer 7 balancing we will have multiple server groups configured, and it is in the configuration of the frontend server where to place logic to determine where the connection is forwarded.
- Open the HAProxy configuration into a text editor.
- After the global and defaults sections of the configuration file, create a new frontend and give it a name. We’ll call our frontend webapp1.
frontend webapp1
- Now bind our floating IP address to the webapp1 frontend on port 80.
frontend webapp1 bind 172.30.0.30:80 - Set the protocol mode to http, which is required for layer 7 balancing to analyze the incoming HTTP request.
frontend webapp1 bind 172.30.0.30:80 mode http - Create a default backend server group. User will land here when the request doesn’t match the policies we’ll be creating.
frontend webapp1 bind 172.30.0.30:80 mode http default_backend webapp1-main - Let’s create our first acl named url_forum. This acl will be used to forward all requests for our forum to a separate group of servers.
frontend webapp1 bind 172.30.0.30:80 mode http acl url_forum path_beg /forum default_backend webapp1-main - Next, we need to create a rule to forward all requests matching our url_forum acl to our forum’s backend servers. We’ll call our forum backend server group webapp1_forum.
frontend webapp1
        bind 172.30.0.30:80
        mode http
        acl url_forum      path_beg     /forum
        use_backend webapp1_forum if url_forum
        default_backend webapp1-main
Create the Backend Servers
Backends are used to define the different server groups or clusters. We’re going to create two backend server groups called webapp1_main and webapp1_forum. The first one is where all requests will land by default, and the second one is where any request starting with /forum in the URL, after the domain name, will land.
Backend Webapp1_main
- Under the frontend sections of the HAProxy configuration file, start a new backend called webapp1_main.
backend webapp1_main
- Set the protocol mode to match the frontend.
backend webapp1_main mode http - Set the load balancing algorithm for the backend servers. We’ll use Round-robin.
backend webapp1_main mode http balance roundrobin - Let’s add our first server, webserver1, to the backend cluster by adding its IP address and the port number its web server listens on.
backend webapp1_main mode http balance roundrobin server webserver1 172.30.0.27:80 - Now let’s add a second server to this backend.
backend webapp1_main mode http balance roundrobin server webserver1 172.30.0.27:80 server webserver2 172.30.0.28:80 - The first backend is created. Let’s create the second one now.
Backend Webapp1_main
- We’re going to create the second backend cluster called webapp1_forum using the same configuration as the first. The only different will be the servers we use in the cluster.
backend webapp1_forum mode http balance roundrobin server webserver3 172.30.0.50:80 server webserver4 172.30.0.51:80 - Save your changes to the configuration file and exit the text editor.
- Reload the HAProxy configuration file.
service haproxy reload
Balancing Algorithms
roundrobin
Each server is used in turns, according to their weights. This is the smoothest and fairest algorithm when the server’s processing time remains equally distributed. This algorithm is dynamic, which means that server weights may be adjusted on the fly for slow starts for instance.
leastconn
The server with the lowest number of connections receives the connection. Round-robin is performed within groups of servers of the same load to ensure that all servers will be used. Use of this algorithm is recommended where very long sessions are expected, such as LDAP, SQL, TSE, etc… but is not very well suited for protocols using short sessions such as HTTP. This algorithm is dynamic, which means that server weights may be adjusted on the fly for slow starts for instance.
source
The source IP address is hashed and divided by the total weight of the running servers to designate which server will receive the request. This ensures that the same client IP address will always reach the same server as long as no server goes down or up. If the hash result changes due to the number of running servers changing, many clients will be directed to a different server. This algorithm is generally used in TCP mode where no cookie may be inserted. It may also be used on the Internet to provide a best-effort stickyness to clients which refuse session cookies. This algorithm is static, which means that changing a server’s weight on the fly will have no effect.
uri
The left part of the URI (before the question mark) is hashed and divided by the total weight of the running servers. The result designates which server will receive the request. This ensures that a same URI will always be directed to the same server as long as no server goes up or down. This is used with proxy caches and anti-virus proxies in order to maximize the cache hit rate. Note that this algorithm may only be used in an HTTP backend. This algorithm is static, which means that changing a server’s weight on the fly will have no effect.
url_param
Similar to uri, except the URL parameters are also used in the hash. This is ideal for permalink-type URLs used by WordPress and other content management systems.
Health Checks
When a server in our load balancing cluster becomes unavailable, we do not want traffic to be forwarded to it. Health checks are a way of automatically discovering servers that stop responding. Health checks are enabled by adding the check option to a server in the backend, as seen in the example below.
backend webapp1-servers
        balance roundrobin
        mode tcp
        server webserver1 192.168.1.200:80 check
        server webserver2 192.168.1.201:80 check
        server webserver3 192.168.1.202:80 check
Server Maintenance
Every servers requires some form of maintenance at some point in its life. To bring a server offline for maintenance and to prevent traffic from being forwarded to it while it’s offline, we can use the disabled option.
backend webapp1-servers
        balance roundrobin
        mode tcp
        server webserver1 192.168.1.200:80 check
        server webserver2 192.168.1.201:80 check
        server webserver3 192.168.1.202:80 check disabled
Conclusion
We now have a functioning layer 7 load balancer. I’ve only covered the basics in this tutorial. There are many more advanced options available, allowing you more control over which servers get traffic and when.
Tutorials in this series: