Overview
Your web application has launched and is starting become very popular. You should be very excited, but you are not. Although your database server is appears to be mostly idle, your front-end web server is on the verge of meltdown.
It’s time to start scaling our web application horizontally across multiple frontend nodes. Not only will this improve performance, but we also gain redundancy – the ability to survive a frontend server failure.
In order for us to scale out horizontally, we need something that sits in front of our web servers to receive our traffic and forward connections evenly between all of our web servers. That something is called a Load Balancer, and there is a large variety of them available, from the very simple to the more advanced enterprise level.
Server Architecture
In the previous two tutorials in this series, all services were hosted on the same computer. Now that we need to scale out horizontally, we need to introduce separation of roles. At minimum, you will have the following server infrastructure.
- One load balancer.
- Two web servers.
- One database server.
The figure below visualizes how each server relates to each other. The load balancer will sit in front, receiving all new incoming connection requests for the web application. Depending on the policies set by the balancer, the request will be forwarded to one of two web servers. Each web server is connected to the same database backend, to ensure the same content is delivered.
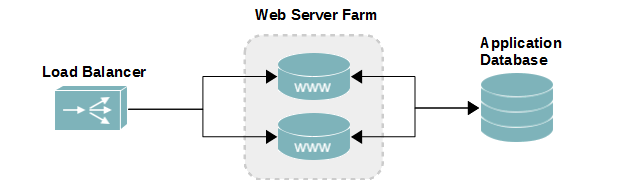
- Web server load balancer diagram
For redundancy, you will want to make a load balancer cluster and a database server cluster. Just having the four servers listed above makes you vulnerable to service outages if your load balancer or database server fails. However, that is outside of the scope of this tutorial.
Balancing Modes
Load balancing can work one of two ways: round-robin all traffic to all web servers or by inspecting of incoming packets to forward the user to the appropriate web server. The two methods are known as Layer 4 and Layer 7, respectively.
Layer 4
Layer 4 balancing is by far the fastest, least resource taxing method of balancing your traffic. It is also the most limited method. With layer 4, you forward traffic between all nodes using round-robin or weighted averages. The forwarding process works by modifying the destination information in each packet, which takes very little effort. This method is recommended only when all nodes are running the exact same application(s) using the same engines (PHP, Python, Java, etc.). Your users’ experience will drop dramatically if each node isn’t configured identically.
Layer 7
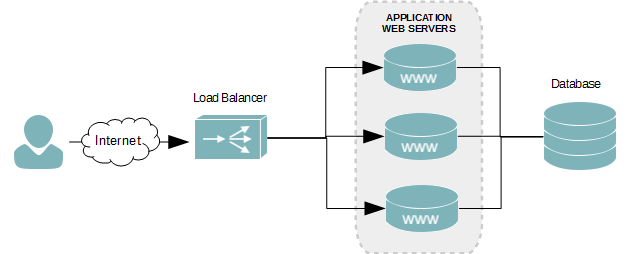
Layer 7 balancing is an intelligent means of balancing your traffic. It can forward traffic based on information in the HTTP connection request. By analyzing the HTTP request sent by a user, you can forward traffic to different groups of servers. In the diagram below, there are three separate groups of servers, each hosting different content – one for a blog, one for a forum, and one for everything else.
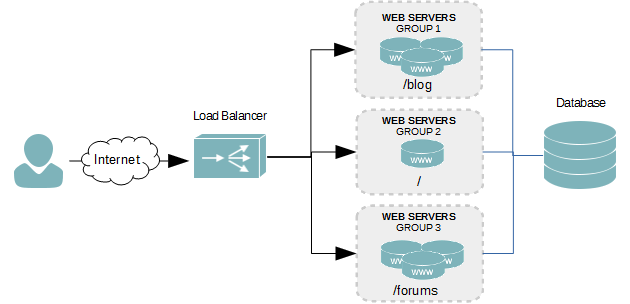
By allowing us to redirect requests to different servers depending on the content being requested, we can separate the different areas and scale them individually as needed. As in the diagram above, one server is capable of satisfying all requests, except for the blog and forums, which generate a lot of traffic. For those areas, we need more horsepower, so we’ve added three servers to those groups.
Another way of separating traffic is by content type. We could place all PHP files on one group of servers, all static content – HTML, Javascript, and CSS – on another group, and all multimedia on a third. Static content requires very little processing power, so it makes sense to place these on less costly servers to save money. Dynamic content powered by Java or PHP languages, as well as multimedia, tend to require more hardware resources. These would be hosted on more expensive hardware. The separation of content types becomes even more important when dealing with multiple types of backend programming languages. Having PHP, Python, and Java on the same server may cause reliability issues.
Forwarding is done behind the scenes and transparently to the user. If you, instead, decided to power each of these areas all on the same servers, your reliability and security would suffer tremendously. You would also need a lot more resources as you scaled out, with much of it wasted, if not everyone access your blog or ecommerce sites.
One thing to keep in mind with Layer 7 balancing is that it requires more processing. We’re not just modifying the packet header and routing it to one of the available web servers; we’re analyzing the request to determine where it needs to go and then modifying the packet for re-routing.
Web Servers
When clustering servers into a load balancing group, you must ensure that you maintain application file versions across each of them. Otherwise, each user will receive a different user experience.
A layer 4 load balanced cluster requires all servers to have the most update version of every application file – html, javascript, CSS, PHP, etc. Otherwise, everytime a user accesses the web site, they will be presented with a different version. Layer 7 load balancing differs in that you will have different groups of servers hosting different parts of your website. This adds a lot of complexity to how you maintain the user experience. There are more than likely going to be files and graphics, like CSS stylesheets and your logo, shared amongst all nodes. And then each group of servers will each need to most recent version of the part of your website they are hosting.
Here are a few examples of how you can ensure each web server has access to the same file versions for your application.
- Host the web content on an NFS or Samba file server. Each web server then mounts the required paths from the file server.
- Use Rsync scripts from your staging server that copies updated versions of your files to each production web server.
- Upload the modified files to each web server manually.
Database hosting presents another challenge when you start scaling out your web applications with load balancers. Each node requires access to the database, but where do you place the database server? Unlike in part 1 and part 2 of this series, where the database server was hosted on the same computer as the web application, we need to decouple the database server and place it onto its own hardware. It will no longer be practical to host your database on all web servers in the cluster.
To learn how to build a standalone web server, follow the instruction in Deploy an Apache web server on CentOS 6
Load Balancer
The two most popular software balancers today are HAProxy and Nginx; the former is a full-time balancer while the latter is a very popular web server. Although they both work well, it’s doubtful you will see them used in large enterprise environments. In those location, it is more likely you will see advanced load balancing appliances by Citrix and F5. Both vendors provide solutions that scale well to meet traffic demands and provide advanced feature sets.
Using Nginx
Details on how to configure Nginx web application load balancing on CentOS 6 can be found in Load Balancing Web Servers with Nginx on CentOS 6
Database Server
A default MySQL Server 5 installation on a CentOS 6 with SELinux enabled (absolutely recommended) blocks all remote query requests, regardless of user privileges. With the introduction of a standalone database server, we need to both allow remote queries into the database server and grant access to the application’s database account from all frontend web server nodes in the load balance cluster.
Enable SELinux Policy
- Log onto the database server with an account that has administrative rights.
- The the following command to enable the allow_user_mysql_connect policy. The -P switch makes the policy persistent, which means the setting will survive a reboot. Without it, the change is only temporary.
setsebool -P allow_user_mysql_connect on - Because it’s being made persistent, the policy change may take 10-20 seconds to apply.
Database User Account Remote Access
For each frontend web server querying the database server, a separate MySQL account should exist, for security reasons. You could have one account which allows access to any host or an account allowed access from hosts on a specific subnet; however, the best practice is to explicitly allow only those servers who actually need to query the database. For this reason, we’re creating a account for each web server to mimimize the risk of a query from an unauthorized server.
- Log onto the database server.
- Log into MySQL with an account that has administrative privileges.
- Create an application account for node 1 for the application’s database.
CREATE USER 'mywpsite_service'@'web01.serverlab.intra' IDENTIFIED BY '2qrYzFrxcXctsHq66erd9NYBuwq4enbX'; - Create an application account for node 2 for the application’s database.
CREATE USER 'mywpsite_service'@'web02.serverlab.intra' IDENTIFIED BY '2qrYzFrxcXctsHq66erd9NYBuwq4enbX'; - Grant permissions to the first account.
GRANT SELECT,INSERT,UPDATE,DELETE,INDEX,CREATE ON MyWPSite.* TO 'mywpsite_service'@'web01.serverlab.intra'; - Grant permissions to the second account.
GRANT SELECT,INSERT,UPDATE,DELETE,INDEX,CREATE ON MyWPSite.* TO 'mywpsite_service'@'web02.serverlab.intra'; - Flush the existing privileges to load our changes.
FLUSH PRIVILEGES;
Conclusion
Scaling your application out from a single server to multiple server adds new challenges that you will need to overcome. A lot more though needs to be put into how secure your servers, who can access the services, how access is granted to the services, and how do you keep your content update across all web servers.
Tutorials in this series:


