Overview
This is the first part in a series that will guide you through planning and deploying different scales of web application infrastructures on CentOS 6. We’ll start small by creating an all-in-one standalone box, hosting the web server and database server.
Your first goal before even thinking about building your server is understanding the web application it will eventually host. What will its workload be like? Will it be multimedia heavy? How dynamic is the content and how frequently will it update on screen? Will it just serve static web pages which are rarely modified? Your server configuration will vary wildly depending on the answers to those questions. For demostration purposes, we are going to use WordPress for our web application . It was chosen because of its popularity and ease of installation. We won’t have to waste much time configuring it on our application server.
Our WordPress application will neither have dynamically updating content on screen nor loads of multimedia. It will be used for basic blogging consisting mostly of text with some multimedia. Its I/O profile will mostly be reads with a few writes when new content is added. We need to know this information to ensure the application is deployed properly and optimized as much as possible, which will be discussed in Part II of this series. It will be expected that you have some experience working with Linux-based operating systems. Therefore, this is a Level 200 lab.
Objectives
We’ll cover the following in this part of the lab series.
- Provision a single server for our web application
- Install and configure Apache, PHP, and MySQL
- Harden the server
The Scenario
We’ve been tasked with deploying a small web application server for a WordPress blog. We don’t expect too much traffic and we have a tight budget, so all required server roles will be hosted on the same server. Since this server will be public-facing on the Internet, we’ll have to do some hardening to protect it.
Before You Begin
You will need the following to follow along with this lab.
- Virtual machine software to run the lab server (ESX, Hyper-V, VirtualBox, etc.)
- One server capable of running CentOS 6 or higher.
- An Internet connection for the server.
- A CentOS 6 or higher ISO.
We’re starting off by creating an environment you will normally see on an entry-level VPS host or small application development server. In later labs, we’ll scale the server out for larger workloads.
Our web application will have the following configuration.
| Processor | 2 Cores | Web Server | Apache 2.2.15 |
|---|---|---|---|
| RAM | 1 GB | Database Server | MySQL Server 5.1 |
| Hard Disk | 1 x 24 GB | Web Server | Apache 2.2.15 |
| Network Interfaces | 1 | Web Application | WordPress |
Planning the file system and disk partition scheme
One of the most important steps in planning your application server is designing a file system and partition scheme. A proper design can go a long way for performance, reliability and security. A default partition scheme may be easy, but your placing your server in great risk by using it; therefore, it should never be done on a production server. The following are just guidelines to prime you for your own environment. Our ability to sufficiently carve out different file systems for our lab server is limited by the small amount of storage available. The following table details which directories should be placed on their own separate file systems and why.
| /var | The /var directory in Linux contains variable data which may change frequently during the server operation, like log files. This directory has a nasty habit of monopolizing a file system’s free space, which will result in down time if its left on the / (root) partition. |
|---|---|
| /home | Aside from increased security benefits, separating this partition makes upgrading or migrating to a new operating system easier. It also prevents a single user from consuming the / (root) partitions entire free space, which will bring the server down. |
| /webapps | The default root document location used by Apache on CentOS is /var/www/html. You can easily carve this off instead; however, using your own structure is ideal when you expect to host more than one web application on your server, as we will be doing in later in the series. |
Deploying the Server
Now that we’ve planned our file system scheme, it’s time to install CentOS.
- Mount the ISO/DVD and start the CentOS 6.X installation.
- When prompted for a disk partition layout, choose Create Custom Layout and make the following partitions and volumes. The sizes are based on a host with 24 GB of storage, however, you’ll want to match /var/log and /webapps to fit the requirements of your log retention and application storage requirements. What’s important is that you separate the paths into their own mount points.
TABLE3 – Server partitions and volumes Mount Point File System Size Notes MBR – Standard Partitions /boot EXT2 200 MB The boot image is small and it doesn’t need the overhead added by EXT4’s journaling. Other than minimizing the complexity of the file system used by /boot, there are very few benefits for placing it on its own partition with a large majority of today’s Linux distros. LVM – Logical Volumes / EXT4 10 GB /home EXT4 1 GB /var EXT4 5.5 GB. The log volume should be large enough to keep logs in you intend to keep for a certain period of time, for troubleshooting, legel hold, etc. /webapps EXT4 5.5 GB This is a comfortable size for a small web application, like a WordPress site with some locally hosted multimedia. SWAP 1.5 GB Not all web applications utilize the SWAP partition, but MySQL may when under heavy load. If you are unsure how much you need, size this partition to be 1.5x that of your physical RAM. Your partition layout should look similar to the following figure.
There are a plethora of websites that explain more advance disk partitionvolume and file system planning, and I recommend that you read them. For now, this will be sufficient for our needs.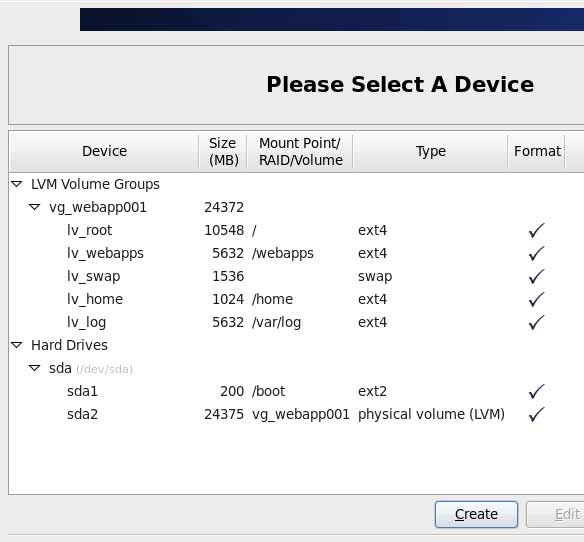
FIG1 – CentOS partition manager - When prompted for the installation type, select Basic Server.
- After the installation completes, log onto the web server and update it.
yum update
Secure the Mount Points
The reason we separate certain paths into their own mount points is to be able to protect them from certain activity. We want to block users from running malicious or unauthorized executables from our /webapps file system, for example.
- Open fstab into a text editor, like VIM, for example.
vim /etc/fstab
- Following along with the disk layout above, find the following lines in fstab and add the highlighted options.
/dev/mapper/vg_webapp001-lv_home    /home     ext4    defaults,nosuid,nodev,noexec   1 2
/dev/mapper/vg_webapp001-lv_log     /var/log  ext4    defaults,nosuid,nodev   1 2
/dev/mapper/vg_webapp001-lv_webapps /webapps  ext4    defaults,nodev,noexec   1 2
nodev Prevents device files from existing on the mount point’s file system. Unless you have some special requirements, device files should only exist in /dev. noexec Prevents executable files from running on the mount points file system. In this tutorial, we have it set for our webapp mount. If your web application requires cgi, this will break the application and you should not add it. - Save the modified fstab file and exit the text editer.
- Reboot the server or unmount and then remount the modified mount points to apply the changes.
Install the Required Software Packages
- Install Apache 2
yum install httpd
- Install PHP5 and extensions for MySQL.
yum install php php-mysql
- Install MySQL Server
yum install mysql-server
Creating Users and Groups
After the deployment is complete, no one should use the Root account unless absolutely required. We need to create two user accounts and two groups, one for day-to-day maintenance of the web applications and another for system administration. After the we’ve created our users and groups, we’ll then secure SSH to only allow our non-administrative accounts remote access. This separation adds another layer of security to help prevent hackers from gaining complete control, if they were successfully in remotely logging in with someones account.
- Create your day-to-day user account.
useradd jsmith
- Set your password for this account
passwd jsmith
- Create your server admin account.
useradd jsmith-admin
- Set your admin account’s password
passwd jsmith-admin
- Create your webadmins group.
groupadd webadmins
- Create your system administrator group.
groupadd sysadmins
- Create a remote administration group for which we’ll grant SSH access.
groupadd remoteadmins
- Add your day-to-day account to the webadmins group.
usermod -G webadmins -a jsmith
- Add your server admin account the system administrator group.
usermod -G sysadmins -a jsmith-admin
- Add the Apache account to the webadmins group to grant it access to our /webapps directory, which will be needed after we secure it below.
usermod -G webadmins -a apache
- Since we want jsmith, being us, remote access into our web server, we need to add the account to the remoteadmins group.
usermod -G remoateadmins -a jsmith
Granting System Administration Rights
We’re now going to assign accounts who need system administration rights to our sysadmins group. Through sudo, the sysadmins group will have full administrative rights. Root will then be given a very complex password to protect it from misuse.
- Open the sudoers file editor
visudo
- Navigate to the bottom of the file and add the following line:
%sysadmins ALL=(ALL) ALL
- To save our settings, press ESC and then type colon (:) and ‘w’.
- Type colon (:) and ‘q’ to exit the editor.
- Set a complex password for the Root account. The longer, more complex it is the better.
Locking Down SSH Access
SSH is a great tool for remote administration of your Linux servers; however, left unprotected using default settings is very risky. Brute forcing into any server is a two step process: find a user account and discover the user account’s password. And what account is known to exist on every Linux server? Root. For this reason it is best practice to prevent Root from having remote access to the server. Another concern is ‘who has access rights into the server?’ By default, SSH will grant access to all accounts. Since not every user should have the ability to SSH into the server, we want to ensure only authorized users can do so. To do this, we are going to configure SSH to only allow users in the remoteadmins group permission to remotely access the server.
- Open the SSH Server configuration file into a text editor, like VIM.
vim /etc/ssh/sshd_config
- Find the line that permits Root logon
#PermitRootLogin yes
Uncomment it by removing the hash mark ‘#’ and replacing ‘yes’ with ‘no’. Note: despite this option being commented out, by default SSH grants Root logon permissions. This is why it is important we uncomment the option and explicitly set it to ‘no’.
PermitRootLogin no
- Now we just want authorized users access into our server through SSH. Add the ‘AllowGroup’ option to the configuration file, and then append the groups we want to allow access to.
AllowGroups remoteadmins
- Save the configuration file and exit the editor.
- Restart the SSH daemon to apply our changes.
service sshd restart
Prepare the Webapps Directory
Before we install Apache and start defining web sites, we need to prepare our webapps directory. Inside of the webapps directory, we’re going to create separate directories for our applications and their logs (see example below).
/webapps
   |---/apps
   |     |---/app1
   |           |---/public_html
   |
   |---/logs
         |---/app1
- Create the directories
mkdir -p /webapps/apps/app1/public_html
mkdir -p /webapps/logs/app1
- Assign the appropriate Selinux security context to our custom web app directories. This grants Apache permissions to access them.
chcon -Rv --type=httpd_sys_content_t /webapps/apps/app1/public_html
chcon -Rv --type=httpd_sys_content_t /webapps/logs/app1/
- Change /webapps group ownership to our webadmins.
chgrp -Rv webadmins /webapps
- Set the guid bit recursively for the webapps directory to ensure all new files and directories are owned by the webadmins group. Also, we’re going to grant read/write access to the webadmins group and file owners, and no access to anyone else.
chmod 2770 -Rv /webapps
- With the public_html directory, we’re going to grant read access to everyone.
chmod 2775 -Rv /webapps/apps/app1/public_html
Configure Apache
- Open Apache’s configuration file into a text editor, like VIM.
vim /etc/httpd/conf/httpd.conf
- Prevent Apache from advertising its version by turning Server Signature off. To do so, locate the following line
ServerSignature On
and replace it with
ServerSignature Off
- Prevent Apache from advertising operating system info. To do so, locate the following line
ServerTokens OS
and replace it with
ServerTokens Prod
- Change the location of the web applications root directory from /var/www to our new location. Find the following line
<Directory "/var/www/html">
and replace it with
<Directory "/webapps/apps/app1/public_html">
- Prevent directories from showing their contents in a web browser by removing the Indexes option. To do so, find the following, located just under the line we modified above.
Options Indexes FollowSymLinks
and replace it with
Options FollowSymLinks
- Change the location of the error log by locating the following line
ErrorLog logs/error_log
and replace it with
ErrorLog /webapps/logs/app1/error_log
- Change the location of the access log by locating the following line
CustomLog logs/access_log combined
and replace it with
CustomLog /webapps/logs/app1/access_log combined
- Save the changes and exit the text editor.
- Start the Apache daemon.
service httpd start
- Configure the Apache daemon to start automatically after boot.
chkconfig httpd on
Configure MySQL Server
- Set MySQL Server’s daemon to automatically start after every boot.
chkconfig mysqld on
- Start the MySQL Server daemon.
service mysqld start
- To set Root’s MySQL password, remove anonymous user access, and disallow Root to connect remotely, run the following command. Remember to enter ‘y’ when prompted to reload the privilege tables; otherwise, you account changes will not be applied.
/usr/bin/mysql_secure_installation
- Log into MySQL’s console
mysql -u root -p
- Create a user account for yourself
CREATE USER 'jsmith'@'localhost' IDENTIFIED BY 'mypassword';
- Grant administrative privileges to your account.
GRANT ALL ON *.* TO 'jsmith'@'localhost' WITH GRANT OPTION;
Granting yourself all privileges can be very dangerous. Your account should only ever be used for administrative purposes. - Create a database for your web application. Our example will be for a WordPress website using a database called MyWPSite.
CREATE DATABASE MyWPSite;
- Our web application is going to need an account that allows it to query, add and delete items from our database. We’re going to name the account mywpsite_service and it assign it a fairly complex password.
CREATE USER 'mywpsite_service'@'localhost' IDENTIFIED BY '2qrYzFrxcXctsHq66erd9NYBuwq4enbX';
- Now we’ll grant our web application’s service account only the privileges it actually requires.
GRANT SELECT,INSERT,UPDATE,DELETE,INDEX,CREATE ON MyWPSite.* TO 'mywpsite_service'@'localhost';
- Rename the MySQL Root account. This will prevent most drive-by script hits and some malicious users from breaking into our database server.
RENAME USER 'root'@'localhost' TO 'new_user_name'@'localhost';
- Flush the privilege tables to force the new privileges to be applied.
FLUSH PRIVILEGES;
Configure PHP
- Open PHP’s configuration file into a text editor, like VIM.
vim /etc/php.ini
- There are a few functions that should be disabled to security reasons, unless you know for sure that your web application requires them. Find the following line.
disable_functions =
and replace it with
disable_functions = exec,passthru,shell_exec,system,proc_open,popen,curl_exec,curl_multi_exec,parse_ini_file,show_source
- Find the line containing option display_errors and ensure it is set to ‘off’.
display_errors = Off
- Find the line containing option register_globals and ensure it is set to ‘off’.
register_globals = Off
- Find the line containing option magic_quotes_gpc and ensure it is set to ‘off’.
magic_quotes_gpc = Off
- Save your changes and exit the text editor.
- Restart Apache to apply the new PHP settings.
service httpd restart
Open Port 80 to Allow Access to our Application
Before users can access our web application through a web browser port 80 will have to be opened up. By default, IPtables – a Linux firewall service – blocks this port.
- Run the following command to configure IPTables through a basic GUI-like interface.
system-config-firewall-tui
- Ensure that the firewall is enabled.
- Press Tab to navigate to Customize, and press Enter.
- Scroll down the trusted services list until you see WWW (HTTP).
- Enable access to it by pressing the Spacebar.
- Press Tab to navigate to the Close button, and press Enter.
- Press Tab to navigate to the OK button, and press Enter.
Install our Web Application
As mentioned earlier, we are going to use WordPress as our web application. Using it will give us some insight into considerations that will have to made after the application is installed.
- Download the latest WordPress release into your home directory
wget http://wordpress.org/latest.zip
- Unzip the download.
unzip latest.zip
- Copy the uncompressed files into the public_html folder of our application directory. Do not move the files. Copying is needed to ensure the appropriate permissions are inherited.
cp -R ./wordpress/* /webapps/apps/app1/public_html/
- Open a web browser on a desktop and navigate to your web server.
- Click the Create a Configuration File button to begin the installation.
- Click the Let’s go! button.
- In the database field, enter the name of the database we created for our application earlier –MyWPSite.
- Enter the service account we created for the database – mywpsite_service
- Enter the service account’s password – 2qrYzFrxcXctsHq66erd9NYBuwq4enbX
- Use the default Database Host field value.
- Change the Table Prefix to anything but the default.
- Click Submit.
- If all went well, click Run the Install.
- Enter a name of the website in the Site Title field.
- For security reasons, change the Username value from Admin to something else.
- Enter a password for the user account.
- Enter an e-mail address.
- Click the Install WordPress button.
Securing our Web Application
Whether it’s WordPress or some other web application, there are going to be areas that needed to be protected from the public – a good example is any administration pages. And if your website is public facing, it’s likely you don’t want certain section indexed by search engines. To section will walk you through securing these areas from access and from being indexed.
Protecting the Admin Pages
You need to identify which directories in your web application’s root directory host your admin page files. For word press that directory is /wp-admin. We only want authorized IP addresses or address ranges access into the admin pages, and want to block all other access attempts.
- Open the Apache configuration file into a text editor, like VIM.
vim /etc/httpd/conf/httpd.conf
- Locate the section that defines your website. It will be contained in a <directory> directive, which in this lab will look similar to the following.
<Directory "/webapps/apps/app1/public_html">
- Inside this directory directive, insert the following lines. Replace the highlight IP addresses with those you want to enable access to.
<Directory "/webapps/app1/public_html/wp-admin/">
      Order deny,allow
      deny from all
      allow from 192.168.10.200 192.168.10.201
</Directory>
This will allow only connections from 192.168.10.200 and 192.168.10.201 access into the WordPress admin console from a web browser.
- Save your changes and exit the editor.
- Reload the Apache configuration file
service httpd reload
Use Apache Configuration Files Instead of HTACCESS
Best practices for security reasons is to not use HTACCESS files, as these can easily be manipulated by someone who gains control of your server through your web admin account or from exploitation of your web site’s vulnerabilities. They can also be created by an unauthorized user in a directory where an HTACCESS file isn’t located to set rules that allow them entry into areas they normally couldn’t. WordPress uses the HTACCESS file to write rewrite rules that enable friendlier URLs named permalinks. These should actually be written in Apache configuration files, where they are far more secure.
- Open Apache’s configuration file into a text editor.
vim /etc/httpd/conf/httpd.conf
- Locate the section that defines your website. It will be contained in a <directory> directive, which in this lab will look similar to the following.
<Directory "/webapps/apps/app1/public_html">
- To disable HTACCESS file parsing by Apache, add the following line inside of the <directory> directive.
AllowOverride None
- To enable WordPress permalinks, add the following lines under the AllowOverride option we added above.
RewriteEngine On RewriteBase / RewriteRule ^index.php$ - [L] RewriteCond %{REQUEST_FILENAME} !-f RewriteCond %{REQUEST_FILENAME} !-d RewriteRule . /index.php [L] - Save your changes and exit the editor.
- Reload the Apache configuration file
service httpd reload
Next Steps
Our standalone web server is now primed and ready. Our next major hurdle is optimizing Apache and MySQL to perform well, even during unexpected spikes in traffic. We’ll cover this topic in Part II.
Tutorials in this series:


