Once the domain of Windows clients, more MacBooks and iMacs are finding their way onto small business and corporate networks. These networks typically funnel all Internet-bound traffic through a number of proxy servers.
Any application that requires Internet access will need point traffic towards them. Of course, the network itself usually will not tell you to do so, so we’ll need to tell our Mac to use them.
Proxies can be configured a number of ways, depending on your needs. Desktop applications use the network settings found under System Preferences. However, anything executed from a terminal window may require alternative settings.
Terminal
Developers, DevOps, and administrators spend a lot of their time in Terminal. Unfortunately, the proxy settings set in System Preferences won’t apply here. Instead, we’ll need to set a few environment variables: http_proxy, https_proxy, and no_proxy.
Environment Variables
When to use: quick and dirty ephemeral network configuration settings. These settings only affect the Terminal window session they are used in, and exist for only as long as the session is open.
- Execute one or both of the export commands for HTTP traffic. Most applications will work with the lowercase version, but there are edge cases that require uppercase.
export http_proxy=192.168.1.10:8080
export HTTP_PROXY=192.168.1.10:8080
- Same as with HTTP, use one or both the examples below for HTTPS traffic.
export https_proxy=192.168.1.10:8080
export HTTPS_PROXY=192.168.1.10:8080
- Not all traffic should funnel through your network’s proxy. Typically, all local network traffic should go directly to its destination. We can enforce this by using the no_proxy environment variable.
export no_proxy=localhost,127.0.0.1,*.my.company.lan
User Profile
When to use: When you need persistent proxy configurations between Terminal windows.
- Open ~/.bash_profile into a text editor
- Add the following contents to the file, replacing my.http.proxy.server:8000 and my.https.proxy.server:8000 with the URL and port of your proxy server.
httpProxyServer=my.http.proxy.server:8000
httpsProxyServer=my.https.proxy.server:8000

export http_proxy=$httpProxyServer
export https_proxy=$httpsProxyServer
export HTTP_PROXY=$httpProxyServer
export HTTPS_PROXY=$httpsProxyServer
- Save your changes.
- Open a new Terminal
Every new Terminal window should now have your proxy settings configured.
Network Configuration
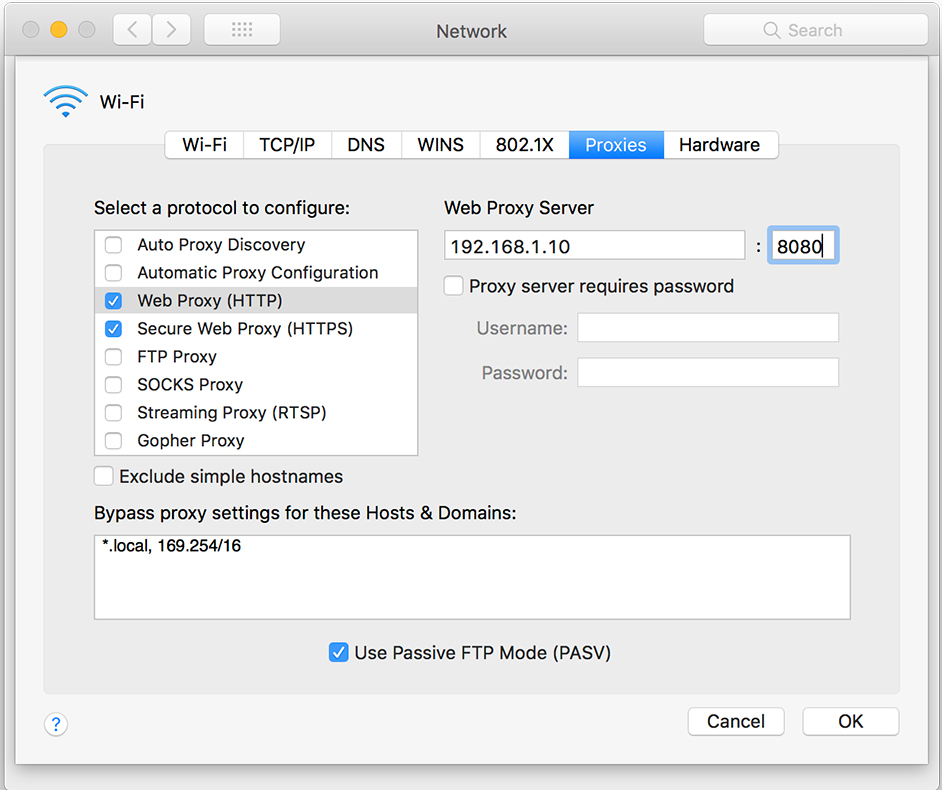
In order for your desktop applications, such as Safari and Chrome, for example, you will need to tell them where to forward Internet traffic to. This can be done in the Network configuration screen, under System Preferences.
- From Launchpad., open System Preferences
- Select Network.
- Click the Proxies tab.
- Under the ‘Select a protocol to configure‘ list, check the protocol you want to set the proxy for. In the example below, we’re providing settings for HTTP and HTTPS traffic.
- Enter the hostname or IP address of the proxy server in the Web Proxy Server form field. The field next to it is where you set the proxy’s port number. If you require a username and password, enter them into the appropriate fields
- Click OK to save your settings.


