Overview
This tutorial will walk you through configuring your network configurations on CentOS 6.X. There are three different methods to choose from, depending on what installation type and packages you have installed.
Manual configuration is done by directly modifying the configuration files. You will need to be comfortable with the command-line for this one. However, this will give you the most flexibility and is worth learning.
System Config Network is a command-line tool that presents a very basic graphical interface. This a great tool for those who just want to quickly configure the network and do not require advanced features, like interface bonding (teaming).
And lastly, from a Gnome desktop. This is for those trying Linux out, who have yet to venture into command-line territory, or have no interest in it at all.
Manual Configuration
This configuration is done by modifying the network configuration directly, using a text editor. This method is typical for servers and is a more advanced way of doing it.
Set the Hostname
- Open the following file into a text editor, like VI or Nano.
vi /etc/sysconfig/network
- Change the hostname value to the fully qualified name of your computer.
HOSTNAME=slcentos6-01.serverlab.intra
- Save your changes and exit the text editor. The new name will be applied after your next reboot.
Set a DHCP Address
- Open the configuration file for the first network interface, eth0, into a text editor.
vi /etc/sysconfig/network-scripts/ifcfg-eth0
- Modify the file to look similar to the example below.
DEVICE=eth0
TYPE=Ethernet
ONBOOT=yes
BOOTPROTO=dhcp
IPV4_FAILURE_FATAL=yes
NAME="System eth0"
- Save your changes and exit the text editor.
- Restart the network service.
service network restart
Set a Static IP Address
- Open the configuration file for the first network interface, eth0, into a text editor.
vi /etc/sysconfig/network-scripts/ifcfg-eth0
- Modify the configuration file to look similar to the one below. Remember to change the highlighted values to match your environment’s.
DEVICE=eth0
TYPE=Ethernet
ONBOOT=yes
BOOTPROTO=none
IPADDR=172.30.0.53
PREFIX=24
GATEWAY=172.30.0.1
IPV4_FAILURE_FATAL=yes
NAME="System eth0"
- Save your changes and exit the text editor.
- Restart the network service.
service network restart
Setting DNS Name Servers
DNS configurations are set in /etc/resolv.conf. Within this file, we can specify the search domains and the name servers. The search domains are used as default suffixes when no domain is added to a hostname.
- Open the resolvr configuration file into a text editor.
sudo vi /etc/resolv.conf
- Add the following lines, modifying it them to match your environment.
domain example.com
search example2.com lab.example2.com
nameserver 8.8.8.8
nameserver 8.8.4.4
- Save your changes and exit the text editor.
- All changes to resolvr.conf are applied immediately.
Using the System Config Network Tool
The System Config Network tool is a terminal application that presents a very basic GUI. It can do basic network configurations, such as configuring static or DHCP addresses, setting the DNS server IP addresses, and setting the default gateway.
Install System Config Network
The base CentOS 6 installation includes the tool by default. To install it on a minimal installation, follow these instructions.
- Install it from the yum repository.
yum intall system-config-network
- If you have no Internet access, install it from the CentOS DVD. Create a directory in /media called cdrom.
mkdir -p /media/cdrom
- Mount the CentOS DVD to the directory.
mount /dev/cdrom /media/cdrom
- Run yum and target the repository that uses the DVD.
yum --disablerepo=/* --enablerepo=c6-media install system-config-network
Configure the Network Settings
- Launch the System-Config-Network tool from the terminal.
system-config-network-tui
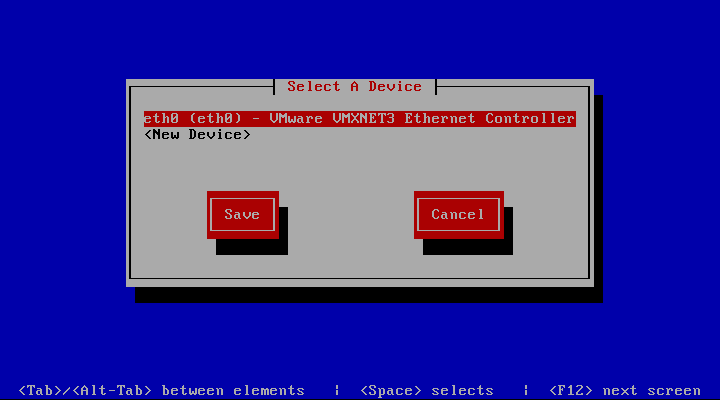
- Ensure Device Configuration is highlighted, and then press Enter.
- Select the network interface you want to configure, and then press Enter.
- For Dynamic IP address allocation, ensure the Use DHCP box is checked. Otherwise, for static IP address allocation, enter the static IP address, netmask, default gateway, and DNS server information.
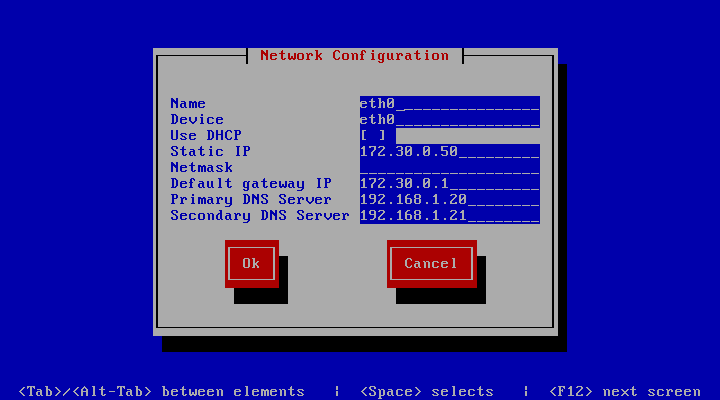
- Tab to highlight Ok, and then press Enter.
- Press tab until Save is highlighted, and then press Enter to save your changes.
- Press tab until Save&Exit is highlighted, and then press Enter to save your changes.
- To apply your changes, restart your network services.
service network restart
From a Gnome Desktop
Gnome is the default environment for CentOS 6 Desktop installations. There are plenty of alternative environments that can be installed, but being the default, this one is more widely used.
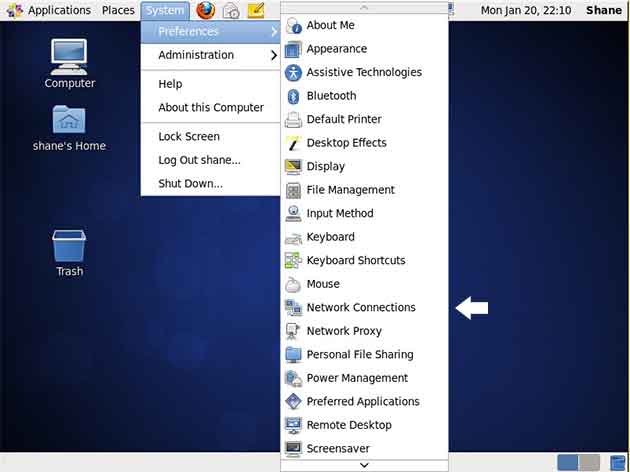
- Click to expand the System menu, expand Preferences, and then click Network Connections.
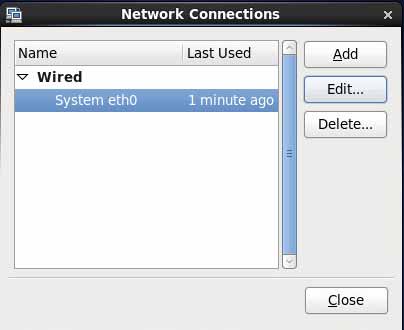
- From the list of connections in Network Connections application, select the interface you want to configure.
- Click Edit.
- Click the IPv4 Settings tab.
Set a DHCP Address
- From the Method drop-down list, select Automatic (DHCP).
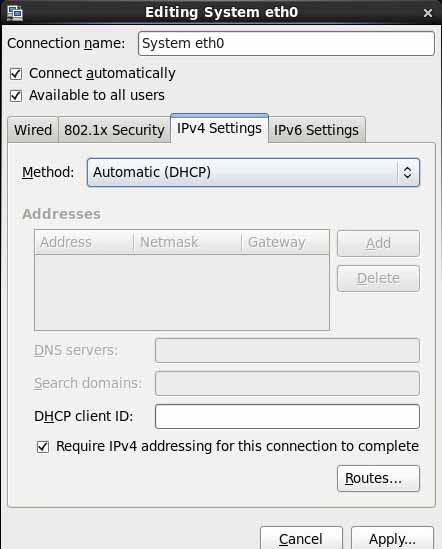
- If required by your DHCP server, set a Client ID in the DHCP Client ID input box.
- Click Apply to save your changes.
Set a Static IP Address
- From the Method drop-down list, select Manual.
- Click the Add button, located beside the Addresses table.
- Enter an IP address into the Address field.
- Enter a subnet mask in the Netmask field.
- Enter the gateway address in the Gateway field.
- Enter the IP addresses of your DNS servers in the DNS servers input box, separating each entry with a comma.
- Enter your search domain suffixes in the Search Domains input box, separating each entry with a comma.
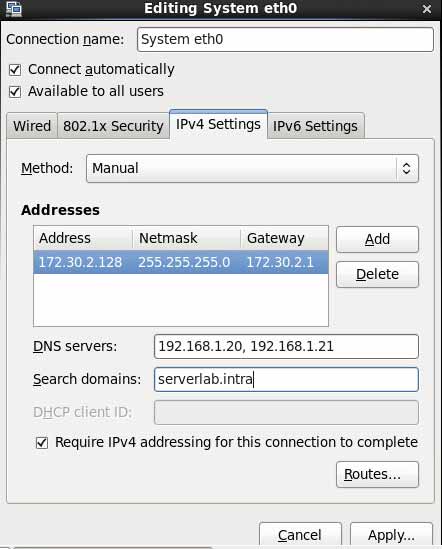
- Click Apply to save your changes.
Conclusion
Following one of the three examples above, you should now have a configured network connection. There are more advanced configurations that can be done, like bonding connections together to increase throughput or add fault tolerance, but those subjects are too advanced for this tutorial.


