Overview
Knowing how to configure your network interface in Ubuntu may come in handy when connecting to certain networks, or when you want to assign a specific IP address to your desktop, laptop or server. This tutorial will guide you through it using both the Unity desktop interface and the command line.
I will cover assigning both DHCP and Static IP from within the desktop and the command line. Remember, you will need administrative rights to make the change. If you do not already have sudo rights, which the first account created during installation does by default, you will have to request it from the adminstrator.
Static IP Addresses
From Command Line
- Open the network interfaces configuration file into a text editor, like VI or Nano.
sudo vi /etc/network/interfaces
- Find the line for the first network interface, ETH0.
auto eth0
- Modify the lines directly below it with the following, replacing the highlights values with those of your environment.
auto eth0
iface eth0 inet static
address 172.16.10.200
gateway 172.16.10.1
netmask 255.255.255.0
- Save your changes and exit the text editor.
- Restart the network services to apply the changes.
sudo /etc/init.d/networking restart
- To configure DNS, open the resolv.conf file into a text editor.
sudo vi /etc/resolv.conf
- Add DNS search suffexes to enable resolving single-label names into fully qualified names, if they exist. Separate multiple domain names using a space ” “.
search serverlab.ca dev.serverlab.ca
- To add DNS name servers, add the following, remembering to replace the highlighted values with those of your environment.
nameserver 8.8.8.8
nameserver 8.8.4.4
- Save your changes and exit the text editor.
- Changes will apply automatically. You do not need to restart any services.
From the Desktop
- Launch the Network Connections control panel by clicking the network icon (updown arrow icon) in the Application Indicator, and then click Edit Connections…

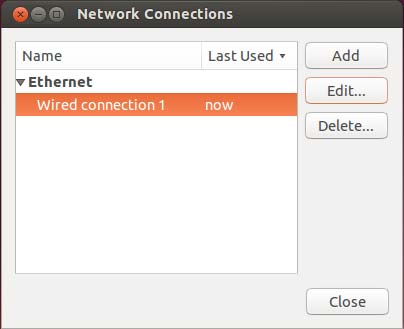
Ubuntu Network Connections menu - In the Network Connections application, select the interface you want to configure, and then click Edit…

Ubuntu network connections dialog box - In the Editing network interface name window that pops up, select the IPv4 Settings tab.

Network connections dialog box – IPv4 Settings tab - Click the Method drop-down box and select Manual.
- Next to the Addresses table, click Add.
- Under the Address field, enter your static IP address.
- Under the Netmask field, enter the subnet mask for the network.
- Under the Gateway field, enter the IP address of your router.
- To set the DNS server IP addresses, enter them into the DNS Servers input box, using a comma to separate multiple servers.
- To set a DNS search domain, enter them into the Search Domains input box, using commas to separate multiple domains.

Editing Ubuntu Network Connection dialog box - Click Save… to save changes.
- Your new network settings should now apply. If not, you can apply them by click the network icon (up/down arrow) in the Application Indicator bar, and then click the network connections name.

Dynamic IP Addresses (DHCP)
From Command Line
- Open the network interfaces configuration file into a text editor, like VI or Nano.
sudo vi /etc/network/interfaces
- Find the line for the first network interface, ETH0.
auto eth0
- Modify the lines directly below it with the following, replacing the highlights values with those of your environment.
auto eth0
iface eth0 inet dhcp
- If there are lines similar to the following right below, remove them.
address 172.16.10.200
gateway 172.16.10.1
netmask 255.255.255.0
- Save your changes and exit the text editor.
- Restart the network services to apply the changes.
sudo /etc/init.d/networking restart
From the Desktop
- Launch the Network Connections control panel by clicking the network icon (updown arrow icon) in the Application Indicator, and then click Edit Connections…
- In the Network Connections application, select the interface you want to configure, and then click Edit…
- In the Editing network interface name window that pops up, select the IPv4 Settings tab.
- By default, the system should already be set to DHCP. If it is not, click the Method drop-down box and select Automatic (DHCP).
- Most DHCP services will automatically assign a DNS and search domain. However, you can override these settings by setting own.
- To override DNS settings, enter the IP address of your DNS host(s) in the Additional DNS Serversinput box.
- To add a search domain, for resolving single names into fully qualified names, enter the fully qualified name of the domain(s) you would like the system to search in the Additional Search Domains input box.
- Click Save to save your changes.
Setting the Hostname
You may not like the default hostname given to your computer, or you may need to change the name for other reasons. Use the following steps to update your computer’s name.
From Commandline
- Run the hostname command with your desired computer name.
sudo /bin/hostname mycomputer
Network Bonding
Network bonding is a great tool that allows administrators to do things such as load balance an IP address over multiple network interface cards or create large aggregates to increase an interfaces bandwidth.
I’ve already covered bonding in Ubuntu 13 in two other tutorials.
Choose the appropriate tutorial to learn how it’s done.


