Overview
Maybe you want to add resiliancy to your networking, or you need to aggregate your network connections to improve throughput. This tutorial will walk you through bonding your network connections to accomplish those tasks, from the Unity desktop in Ubuntu 13.
Hardware Requirements
In order to bond network connections, you will need at least two network interface cards installed. Each interface must be connected to the same network. For more advanced bonding techniques, like true interface aggregation, you will also need a switch that supports 802.3ad.
Verify Available Network Interfaces
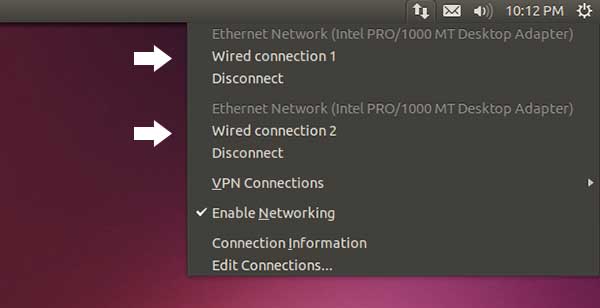
- Ensure two or more network connections exist from different NICs and that they are connected to the network. To verify, click the network icon (up/down arrow) in the Application Indicator bar.
Install the Required Packages
A default installation of Ubuntu 13.X will not contain the required packages. We need to download and install them.
- Open a new Terminal window.
- Install the ifenslave package.
sudo apt-get install ifenslave-2.6
- Load the bonding module into kernel
sudo modprobe bonding
Create the Virtual Network Interface
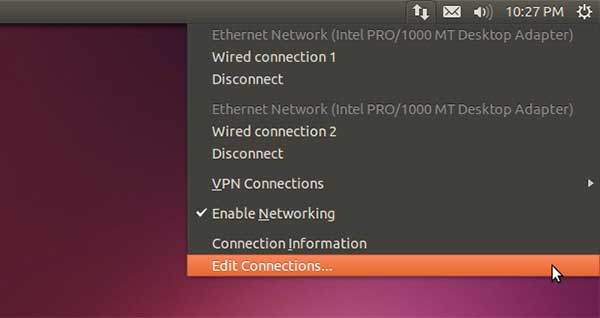
- Click the network icon (up/down arrow) in the Application Indicator bar, and the click Edit Connections…
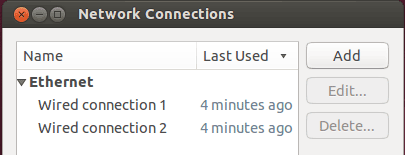
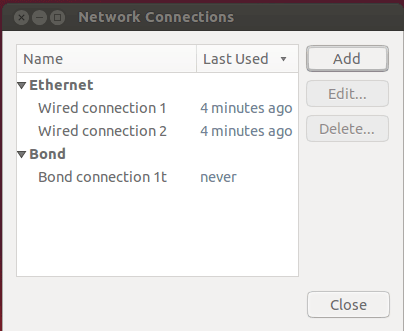
- In the Network Connections application, click the Add button.
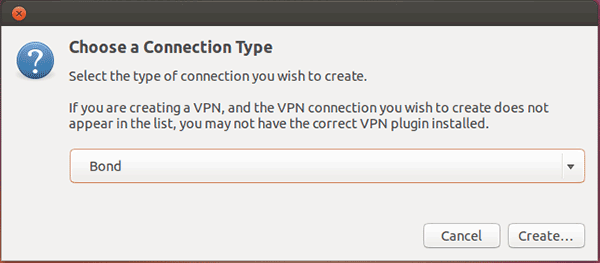
- When the Choose a Connection Type dialog box appears, select Bond from the drop down menu, and then click Create…
- Under the Bond tab, give your bonded interface a name by typing it into the Interface name input field. The default name is bond0.
- Click Add to add the network interfaces to the bond.
- When the Choose a Connection Type dialog box appears, select Ethernet, and then click Create… to create the first slave interface.
- Select the network interface for the first slave by selecting its MAC address from the Device MAC Address drop-down list.
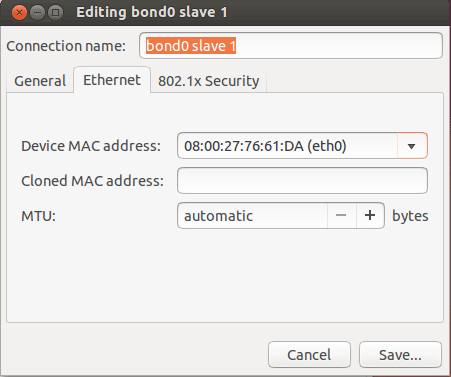
- Click Save… to add the slave interface to Bond0.
- In the Edit Bond Connection dialog box, click Add to add the second slave.
- In the dialog box the appears, select the second network interface for bond0 by choosing its MAC address from the Device MAC address drop-down list.
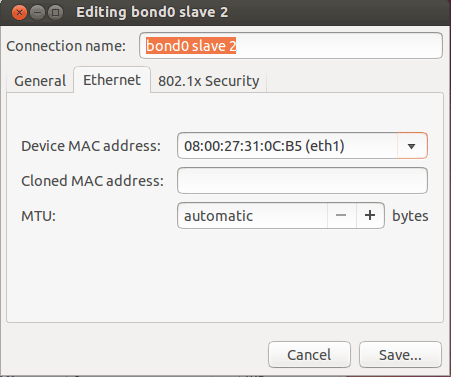
- Click Save… to add the slave interface to Bond0.
- You should now see both interfaces listed for the bond0 virtual interface.
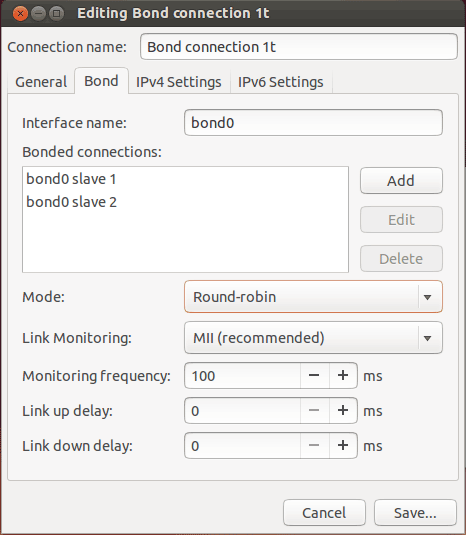
- Select the bond mode by choosing it from the Mode drop-down list. The available bonding modes are listed below.
Mode Description Round Robin Transmit packets in sequential order from the first available slave through the last. This mode provides load balancing and fault tolerance. Note: DNS caching may cause one slave to receive more traffic, creating a possibly large inbalance. Active Backup Only one slave in the bond is active. A different slave becomes active if, and only if, the active slave fails. The bond’s MAC address is externally visible on only one port (network adapter) to avoid confusing the switch. This mode provides fault tolerance. The primary option affects the behavior of this mode. XOR XOR policy: Transmit based on [(source MAC address XOR’d with destination MAC address) modulo slave count]. This selects the same slave for each destination MAC address. This mode provides load balancing and fault tolerance. Broadcast This mode causes all slave’s to transmit the same packets to the destination to provide fault tolerance. This mode does not provide load balancing. 802.3ad Increases network throughput by combining the two interfaces into a single virtual interface. For example, two 1Gb interfaces can be aggregated into a single 2Gb interface.This mode requires a network switch capable of 802.3ad. Adaptive transmit load balancing
Linux bonding driver mode that does not require any special network switch support. The outgoing network packet traffic is distributed according to the current load (computed relative to the speed) on each network interface slave. Incoming traffic is received by one currently designated slave network interface. If this receiving slave fails, another slave takes over the MAC address of the failed receiving slave Adaptive load balancing
The receive load balancing is achieved by ARP negotiation. The bonding driver intercepts the ARP Replies sent by the local system on their way out and overwrites the source hardware address with the unique hardware address of one of the NIC slaves in the single logical bonded interface such that different network-peers use different MAC addresses for their network packet traffic. - Next, we’ll set the bond’s IPv4 settings.
Setting the Bond’s IP Address
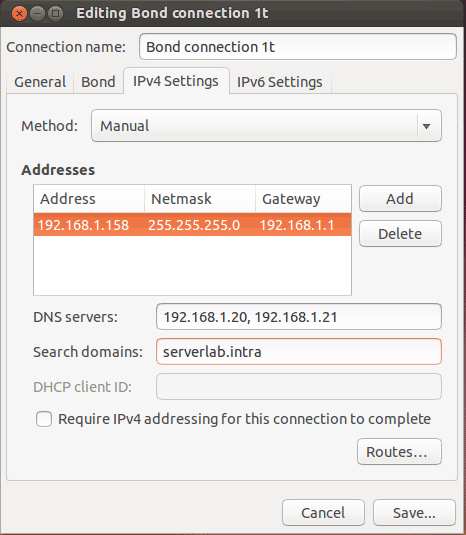
- With the Editing Bond connection dialog box still open, click the IPv4 Settings tab.
- For DHCP settings, leave the default selection in the Method drop-down list.
- To configure a static IP, select Manual from the Method drop-down list. Then click the Add button to set the IP address, Netmask, and Gateway for the interface. Next, add the IP addresses of the DNS servers and define the domain search suffexes.
- Click Save… to save create the bonded network interface, bond0.
- You should now see the new bond0 network interface in the Network Connections dialog box.
- Reboot the computer to ensure the bonding module is loaded into the kernel and to restart the network daemon. Simply restarting the network daemon from the terminal kept crashing my system, however, your mileage may vary, as my tests where done in a virtual lab.
Testing the Bonded Connection
You should now have a fully working bonded network. To test it, do the following.
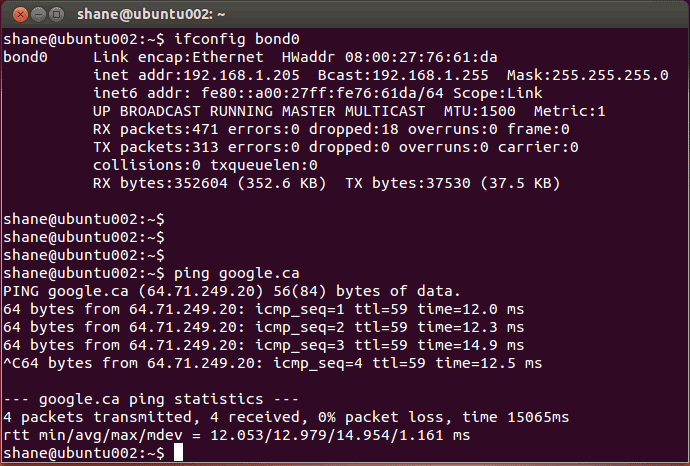
- Open up a new Terminal window.
- Check bond0’s configuration by using ifconfig.
ifconfig bond0
- Ping another system or a known Internet address to ensure packets are send and received.
- If all went well, you should have similar results as in the figure below.
Conclusion
Bonding network interfaces in Ubuntu 13’s Unity Desktop was a little flaky, and not nearly as intuitive as it should be. However, I was able to get it to work after fiddling around with the configuration process.
It’s important to remember that, although the mechanics underneath are all the same, Ubuntu Desktop networking is different from Ubuntu Server networking. The former has a system that expects configurations to be done through a GUI application, with configuration files being stored in atypical locations, while the latter relies on an admin configuring conf files located in standard areas directly.
Other than in some niche areas, like video production, for example, bonding isn’t typically used in desktop environments. This may explain why it felt so flaky configuring it through Unity. It’s likely not a highly demanded feature on desktop versions of Ubuntu; therefore, it doesn’t receive the polish it so desparately needs.


