Overview
The latest long-term support release of Ubuntu is out, and it’s finally time I released a series on how to use it for your web application’s infrastructure. In the first tutorial I’ll guide you through configuring an all-in-one web server based on LAMP – Linux, Apache, MariaDB, PHP.
If you’ve read through my CentOS 6 series on web server infrastructure, you will find a lot of the concepts are the same – as they should be. The difference between the two series is how each step is done on the two flavors of Linux.
Objectives
- Deploy and configure Ubuntu server.
- Create users and groups for administration.
- Install and configure Apache, MariaDB and PHP.
- Configure firewall settings.
Configuration
The server used in this tutorial will have the following configuration. It’s sized for a relatively small web application. For those interested in running a small blog with a small but respectful amount of traffic, this sizing will fit you well.
| Server Name | CPU | RAM | HDD | IP Address |
|---|---|---|---|---|
| WEB01 | 1x2GHz Core | 1 GB | 1×48 GB | 172.30.0.12 |
I’ve based the storage configuration on what you would expect from a VPS hosted solution, such as EC2, Digital Ocean, or Linode. This isn’t the most secure configuration, as you would typically separate certain paths onto their own volumes to protect them from malicious behavior.
| Mount Point | File System | Size |
|---|---|---|
| / | EXT4 | 30 GB |
Create User Accounts and Groups
The great thing with Ubuntu is you never start with the root account; you are given an account that is privileged enough to escalate its permissions to run as root, instead. However, you are the administrator of the server. Other administrators, services, and in some cases developers should each have their own accounts, too. Your first after the installation or deplyoment of Ubuntu is to create the individual accounts.
- Create an administrators group for the system admins. This will used to secure SSH, among other things.
addgroup sysadmins
- Add your user account to the sysadmins group.
usermod -G sysadmins -a
- Create an account for your developer. For our example, we’ll create an account called developer1.
adduser developer1
- Create a group for the developers.
addgroup developers
- Add the developer1 user to the new developers group.
usermod -G developers -a developer1
Installing the Packages
The following installs the minimal packages required for a LAMP server. Both the Apache and MariaDB package installation configure their respectful services to start automatically during system boot. Unlike with some other distributions and earlier releases of Ubuntu, we will not have to configure them to auto-start.
- Install Apache
sudo apt-get install apache2
- Install MariaDB
sudo apt-get install mariadb-server
- When prompted during the MariaDB installation, enter a secure password for the root account.
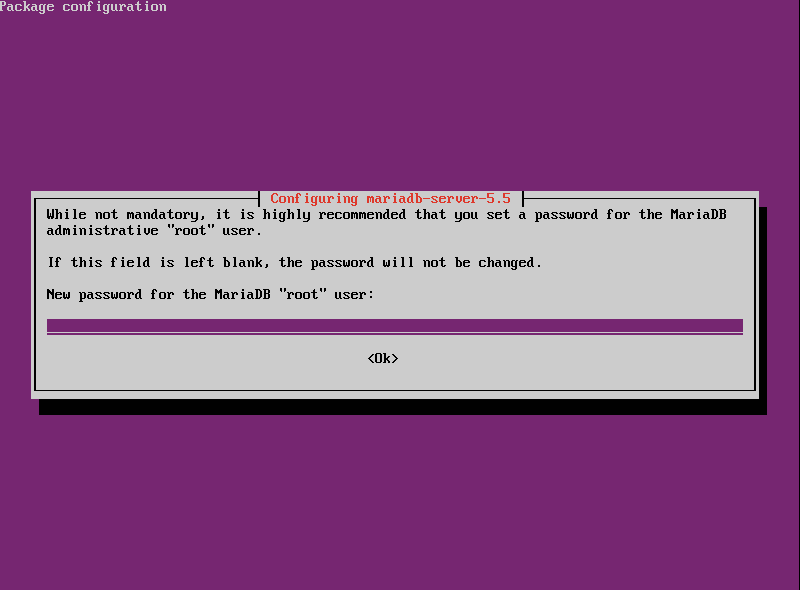
FIG1 – MariaDB Configuration - Install PHP version 5 and the PHP MySQL connector.
sudo apt-get install php5 php5-mysql
- Install OpenSSH Server for remote access.
sudo apt-get install openssh-server
Granting System Administration Rights
We’re now going to assign accounts who need system administration rights to our sysadmins group. Through sudo, the sysadmins group will have full administrative rights. Root will then be given a very complex password to protect it from misuse.
- Open the sudoers file editor
visudo
- Navigate to the bottom of the file and add the following line:
%sysadmins ALL=(ALL) ALL
- To save our settings, press ESC and then type colon (:) and ‘w’.
- Type colon (:) and ‘q’ to exit the editor.
Locking Down SSH Access
SSH is a great tool for remote administration of your Linux servers; however, left unprotected using default settings is very risky. Brute forcing into any server is a two step process: find a user account and discover the user account’s password. And what account is known to exist on every Linux server? Root. For this reason it is best practice to prevent Root from having remote access to the server. Another concern is ‘who has access rights into the server?’ By default, SSH will grant access to all accounts. Since not every user should have the ability to SSH into the server, we want to ensure only authorized users can do so. To do this, we are going to configure SSH to only allow users in the remoteadmins group permission to remotely access the server.
Despite this option being commented out by default, SSH grants Root logon permissions out-of-the-box. This is why it is important we uncomment the option and explicitly set it to ‘no’.
- Open the SSH Server configuration file into a text editor, like VIM.
vim /etc/ssh/sshd_config
- Find the line that permits Root logon
#PermitRootLogin yes
Uncomment it by removing the hash mark ‘#’ and replacing ‘yes’ with ‘no’.
PermitRootLogin no
- Now we just want authorized users access into our server through SSH. Add the ‘AllowGroup’ option to the configuration file, and then append the groups we want to allow access to.
AllowGroups remoteadmins
- Save the configuration file and exit the editor.
- Restart the SSH daemon to apply our changes.
service sshd restart
Secure Your SSH
It’s best practice to harden your SSH server. Ubuntu 14 makes our lives a lot easier as the default installation is well hardened. For example, it does not permit Root logon with a password. Instead, an RSA private key is required for authentication. By default, their is no RSA key generated for Root. This is perfect since the root account should never be used for remote log on. To protect our selves, we can disable Root log on explicitely.
- Open the configuration file for the OpenSSH server.
sudo nano /etc/ssh/sshd_config
- Look for the PermitRootLogin option in the Authentication section of the file. Change it’s value from without-password to no.
# Authentication:
LoginGraceTime 120
::HL::PermitRootLogin no
StrictModes yes

RSAAuthentication yes
PubkeyAuthentication yes
#AuthorizedKeysFile     %h/.ssh/authorized_keys
- Save your changes and exit the text editor.
- Reload the SSH configuration file to apply our changes.
service sshd reload


