Overview
In part one of this series we deployed our application server – a WordPress blog. We dealt with a few security concerns and looked into file system segregation of certain areas that could put our system at risk. Continuing where we left off, we need to take a very hard look at optimizing our server to improve performance while preventing it from be overwhelmed from unexpected traffic spikes. The first thing you need to understand is that there is no magic formula in optimizing your server. I cannot simply give some set values that will work across any type of application or workload. There are, however, guidelines we can follow to give us sane starting points. Unless you know your application very intimately and understand its exact workload, part of the optimization process is going to require stress test benchmarking and continual monitoring after the application goes live. One of the most popular tools for benchmarking an Apache-based web application server is AB (Apache Benchmark – included in the Httpd package used to install Apache). Although this tool will give you a glimmer of an idea of what your server can handle, it’s functionality is limited enough that it cannot possibly give you an absolute image of how well your server will perform. To are lots of variables it simply cannot produce. One of the biggest challenges with optimizing your application server is figuring out how much memory your services should have. In our current lab configuration, our web application server is both the web server and the database server. This complicates the optimization process because you want to ensure each has enough memory to operate without resource starving the other.
Objectives
We’ll cover the following in this part of the lab series.
- Calculate memory divisions for the OS, Apache, and MySQL
- Optimize Apache for balanced performance
- Optimize MySQL for balanced performance
- Benchmark our Server
Our Lab Server’s Configuration
Continuing from part 1, our demo server has the following configuration.
| Processor | 2 Cores | Web Server | Apache 2.2.15 |
|---|---|---|---|
| RAM | 1 GB | Database Server | MySQL Server 5.1 |
| Hard Disk | 1 x 24 GB | Web Server | Apache 2.2.15 |
| Network Interfaces | 1 | Web Application | WordPress |
Dividing Up the Memory
Our application server has only 1 Gigabyte of physical memory available. The challenge is going to be ensuring our services all have enough to run properly while ensuring the system itself also has a sufficient amount to function. It’s never as easy as just using default configurations provided by the application or service. Rarely, if ever, are these settings optimized for your needs. Being that our web site isn’t just a bunch of static html files, its going to need a fair amount of memory. For our database server to respond quickly it, too, will need a fair amount of memory. How much memory each service and our operating system need depends on many factors, which we’ll discuss below.
The Operating System
Your operating system needs memory just as much as your applications. It uses some of the physical memory for caching file system data and other processes, in addition to keeping a buffer. Although MySQL has a number of its own caches, the operating system’s cache is actually were our databases’ data are stored after being accessed. Therefore, we want to leave as much space as we can for the system to ensure we can cache as much of our databases as possible.
Apache
Apache creates worker processes that process client connections. Depending on what modules are loaded and the type of content being requested (Dynamic, Static, Video, Image, etc), each process consumes between 5-42MB of RAM. With our application being WordPress, which is PHP powered, we expect for each Apache worker process to consume around 40MB.
MySQL
Databases can require a lot of memory. How much depends on the size of your data, the application’s workload, and the type of database engine being used. MySQL has many caches to store information for quick retrival, to prevent bottlenecks from having to request data from disk. Although most defaults will work perfectly fine, there are a few that MUST be configured. For MyISAM databases, which is what we’re going to use, we need to define sizes for Key Buffer and Query Cache Size. The key buffer is used to store the index keys for all your database tables. We need to size this buffer to be large enough to hold all indexes from all tables. This can easily be found by combining the file sizes for all *.MYI files of active Databases. The Query Cache is where results for all queries go. Its size is defined by using the query_cache_size option. This allows the database to return results for highly used queries very quickly without having to actually process the query again. For static database content, like blog posts, this cache will give an enormous performance boost to MyISAM databases. After you have assigned memory for the key buffer, your other services, and the system, you should use 70% of the remaining memory for the Query Cache.
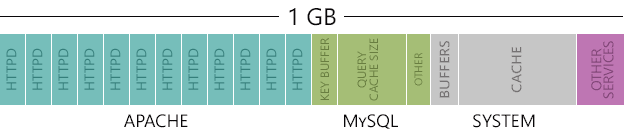
The Memory Divisions
The table and figure below depict the memory divisions we’ve chosen for our application server. This values are were calculated based on the amount of total RAM installed and how the application is going to be used. For a WordPress blog site which handles a lot reads and very few writes, like ours, the following should be fine. These values, however, will not work well for applications that are write-heavy or have very complex queries, like an eCommerce application.
| Operating System | 344 MB | Apache Server | 512 MB |
|---|---|---|---|
| MySQL Server | 128 MB | Other Services | 40 MB |
With our ratios defined, we still need more granular divisions for the various caches of our database server. How you partition MySQL’s memory caches depends greatly on the workload and database engines the server will have, as we mentioned earlier. For now, this is a good starting point. However, it is highly likely we will need to further optimize our memory divisions after doing some benchmarking. Our goal is to ensure we are using as much memory as possible when under load without bringing the server down. So far we’ve only focused on memory. However, there are other areas we need to be concerned about, too. Your processor needs to be able to handle the workload while under pressure. You need to know how processor intensive your application is going to be so that you can spec your system configuration correctly. After optimizing the memory, we may find our web application is extremely slow or unresponsive under light load with most of the memory sitting idle, while the processor is in a state of meltdown.
Disk Swapping
The more data you have cached in memory the more responsive your system will be, as it isn’t held up by the system retrieving it from slow disk storage. The problem is your system only has a finite amount of memory available, so not everything can fit at once. The solution, as you know, is a technique called swapping. It works by moving inactive data from high-speed memory to slow disk, until it is needed. Although this is very helpful in making a desktop environment feel fast while multiple applications are running, it can seriously degrade the performance of your server, especially a database server where large amounts of data could be sitting idle in memory as it should be. Some advocate disabling swapping altogether to force everything into memory. This seems like an excellent idea in theory, however, in practice it can cause even worse performance than excessive swapping. It can also cause your server to crash when it is under stress. A better solution is to configure Linux to only swap to disk when it is absolutely critical, forcing the server to keep everything in memory until there isn’t any more room, regardless of the idle state of the data. The setting to configure how often a Linux computer swaps is called swappiness. It’s value ranges from 0 to 100, with the former meaning minial swapping and the latter excessive swapping. The default value for every Linux installation is 60. For servers, you want this to be between 5 and 10. The value you choose depends ultimately on how much RAM you have installed. Systems with tight RAM availability, like our application server, should be around 10 to allow some swapping. Your mileage will vary depending on your servers workload, so monitor your system and adjust as needed.
- Open the System Control configuration file into a text editor.
vi /etc/sysctl.conf
- If the following line does not exist, then add it. Otherwise, just change the value. I’m using 10 because our server is tight on memory.
vm.swappiness=10
- Save your changes and exit the text editor.
Optimizing Apache
There are two version of Apache available for installation: Apache MDM and Apache Prefork. The default package installed from CentOS’ repository is Apache Prefork. This version of Apache uses worker processes, named httpd, containing a single thread that accept and process one client connection each. The amount of memory used by each worker depends on the content being served and the modules enabled. A dynamic web application powered by PHP, for example, will consume between 30-40 MB of memory with all default Apache modules loaded. We can test this by navigating our web application using a web browser from a client machine while running the top command on the server, monitoring the RES column of every httpd worker process. Since we are carving out 512MB of our 1Gb of memory for Apache, we can do a quick calculation of how many worker processes can run at maximum before the server starts to degrade due to memory overcommitment issues.
- Divide 512MB by the average memory usage of each apache worker process (approximately 34.3 MB). The RAM usage values for each httpd process is listed under the RES column.
- Our result, rounded down, (14) is the maximum amount of workers that should be available to service client requests.
Since each Apache Prefork worker process services a single client connection, twelve workers will service twelve clients connecting to your server concurrently. That seems really low, but unless we achieve thousands of hits an hour, consistently, it will be more than enough for our small application. To increase the amount of workers without installing additional memory or starving other services, we can start disabling Apache modules we know won’t be used. The added bonus is we’ll be increasing security at the same time, even if just minimally.This is where knowing exactly how your web application works and how it will be used is absolutely essential. The following are the options we are going to configure and their values, based on the calculation we made above.
| MaxClients | 14 | This option limits the amount of worker processes allowed to run at any time. We’ll be configuring this option with the value we just calculated above. |
|---|---|---|
| StartServers | 4 | This option defines how many work processes will be available when Apache starts. It cannot be larger than MaxClients. |
| MinSpareServers | 8 | This option defines the minimum amount of spare worker processes, idle waiting for a connection, that can exist. Creating new processes when a connection is made is I/O expensive. We want to ensure we always have workers waiting. |
| MaxSpareServers | 10 | The maximum amount of idle worker processes allowed to exist. |
- Open the Apache configuration file in a text editor.
vi /etc/httpd/conf/httpd.conf
- Find the following section.
StartServers       8
MinSpareServers    5
MaxSpareServers   20
ServerLimit      256
MaxClients       256
MaxRequestsPerChild  4000
As mentioned earlier, these defaults are likely going to either starve your application for resources or overwhelm the server. We need to modify the values to reflect our hardware’s capabilities and balance between other services.
StartServers       4
MinSpareServers    8
MaxSpareServers    10
ServerLimit        14
MaxClients         14
MaxRequestsPerChild  2000
- Now we’re going to disable the modules we have determined are not needed for our web application. Find the following modules in the Apache configuration file. They should all be grouped with other modules. Add hashmark (#) in front of the modules to disable them.
Do not disable the following modules for all web application, even your own personal WordPress site. You need to understand why they aren’t needed before you disable them
#auth_basic_module
#authn_file_module
#authn_alias_module
#authn_anon_module
#authn_dbm_module
#authn_default_module
#authz_user_module
#vhost_alias_module
#userdir_module
- Save your changes and exit the text editor.
- Reload the Apache configuration file.
service httpd reload
Caching Application Page Hits
One thing you can do to improve performance of your web application server is to cache the generated page results, saving the server from having to compile the PHP again and query the database. This works very well when you have a lot of content that is rarely changed, if ever. The version of Apache available in the CentOS 6 repository contains modules that allow you to enable caching to disk – mod_cache, mod_disk_cache, and mod_mem_cache. By default, these modules are enabled and can be used by adding options globally or to a virtual server. Because we have very limited amount of memory, we’ll use mod_disk_cache instead of mod_mem_cache, though you will get far better results using mod_mem_cache when under heavy load. The following options will be defined globally for our web application:
| CacheEnable | disk / | Enables the disk caching feature for the websites root directory. The value “/” is relative to theDocumentRoot option, found in your website’s Apache configuration file. |
|---|---|---|
| CacheRoot | /webapps/cache/app1 | Defines where on disk the cached files will be stored for the website. |
| CacheDefaultExpire | 3600 | The default time in seconds the cached page is to be used. |
| CacheDisable | /wp-admin | Prevent certain directories from being cached. Caching can introduce security issues for areas with allow or deny options set, so you will want to prevent admin like pages, for example, from being cached.Remember, CacheDisable matches against the requested URL – not the file system path. |
- Open the Apache configuration file or the configuration file that defines your Apache virtual host into a text editor, like VI or VIM. In this example, I the application’s settings are in the default httpd.conf file.
vi /etc/httpd/conf/httpd.conf - Locate the Directory directive for our web application or, for virtual hosts, locate the VirtualHostdirective.
<VirtualHost *:80>
    ServerAdmin [email protected]
    ServerName my-webapp.com
    ServerAlias www.my-webapp.com

    DocumentRoot /webapps/apps/app1/public_html

    ...
    other Apache settings
    ...
</VirtualHost>
…
- Add the following lines of code inside of the Directory or VirtualHost directive. Modify the highlighted values to match your environment.
CacheEnable disk /
CacheRoot /webapps/cache/app1
CacheDefaultExpire 3600
CacheDisable /wp-admin
- Save your changes and exit the text editor.
- If it doesn’t already, add the appropriate SELINUX context to the cache directory.
chcon -Rv --type=httpd_sys_content_t /webapps/cache/app1
- Restart Apache to apply your new settings.
service httpd restart
- Alternatively, you can just reload the configuration file.
service httpd reload
For a more detailed explanation to Apache’s caching capabilities, see article Improve Website Performance by Enabling Caching in Apache.
Optimizing MySQL
MySQL optimizations are a lot more tricky than Apache. There’s more complexity and the possibility of database engines running on the same server, with each requiring its own optimizations. They also require continual optimizations as your application grows in size to ensure enough memory is available.
MyISAM Engine
The default engine used with MySQL Server 5.1 installation is MyISAM. For web blog applications where you expect to see far more reads than writes, such as with WordPress, this engine is perfectly fine. You won’t see any benefit from switching to InnoDB. However, if your application is expected to handle a large amount of concurrent writes, like with eCommerce applications or large, multi-publisher blogs, you will need to migrate to InnoDB. Since we’re using MyISAM, we’re going to start off with optimizations for it. Key Buffer One of the most crucial configuration options for MyISAM is the Key Buffer. This buffer is where database indexes are stored for quick reference. The size of this cache should be large enough to hold every key for every database you have.
- To calculate the size of your indexes, run the following command.
du -sch `find /var/lib/mysql -name "*.MYI"`
- Make note of this value. It will be used in the MySQL configuration file.
Query Cache Size This cache stores the results of returned queries. This option is crucial for MyISAM performance. Set this to about 65-70% of the RAM you are leaving available to MySQL. Query Cache Limit The defines the smallest sized query we cache. We want it to be large enough to be large enough to capture the majority of our queries, while not allowing tiny queries from consuming all of our cache. For our WordPress application, a value of between 1 and 2 MegaBytes is ideal. Default Storage Engine This sets the default engine used by new tables. With our application perfectly suitable for MyISAM, we want to ensure all tables are created using this engine. This option will force it. Skip-innodb This option disables the Innodb database engine. When memory is tight and where applications gain no benefit from InnoDB (mostly reads, no foreign keys, etc), you should disable it to free more memory for your MyISAM databases.
Making the Optimizations
- Open the MySQL configuration file into a text editor.
vi /etc/my.cnf
- Find the following options and modify them. If the options do not exist in the configuration file, add them under [mysqld].
key_buffer = 32M
query_cache_size = 80M
query_cache_limit = 1M
query_cache_type = 1
default-storage-engine = myisam
skip-innodb
- Save your changes and exit the text editor.
- Restart the MySQL Server daemon to apply the new settings.
service mysqld restart
Stress Testing the Server
We’ve made our optimizations and it’s time to put our configurations to the test.
- Open two sessions into the application server.
- In session one, monitor your server’s health using top.
- In session two, launch the stress test. In this example, we’re going to hit our home page with 20 concurrent users for 600 seconds (10 minutes). For more accurate results, you should run it for several hours. If you don’t own the hardware, make sure your service provider allows this type of activity.
ab -t 600 -c 20 http://<server-name-or-ip/
- In session one, keep a very close eye on your free memory and the %wa value. If your free memory hits zero and %wa starts increasing, you’re swapping heavily and like to cause the server to crash; it’s a good sign your server cannot handle the load.
- Also, monitor the load average (top right corner of Top). Your values shouldn’t exceed the number of cores in your server. If your application is CPU heavy, you may exceed your processors ability way before you fill your memory.
- It’s important to understand that there is no replacement for real-world data. You may never truly know the traffic your server can handle until it is under load. However, AB will give you a baseline.
Next Steps
Over time our little application server is not going to be able to handle the load it will receive as it becomes more popular. The next step is going to be separating our frontend Apache server from the backend MySQL server. We also want to create a second frontend server to split the load between two servers to increase availability and performance. We’ll cover this topic in Part III of this series. Tutorials in this series:


